

User Guide 1
Welcome to the PocketCarer User Guide!
We are thrilled to have you join our community of self-employed carers who are dedicated to providing exceptional care and support. PocketCarer is more than just a mobile app; it is a powerful tool designed specifically for you, empowering you to manage your work efficiently and effectively while simplifying your business processes.
This user guide has been meticulously crafted to help you navigate through the various features and functionalities of PocketCarer, ensuring that you make the most out of this innovative platform. Whether you are a seasoned caregiver or just starting your journey in the caregiving profession, this guide will serve as your compass, providing step-by-step instructions, helpful tips, and best practices to enhance your experience.
With PocketCarer, we aim to streamline your daily tasks and simplify your administrative responsibilities, giving you the freedom and flexibility to focus on what matters most—providing exceptional care to your clients. Our app enables you to effortlessly manage and track your work, create detailed care logs, and communicate seamlessly with your clients—all in one convenient place.
As you embark on this journey with PocketCarer, we encourage you to explore the diverse range of features and functionalities available at your fingertips. From setting up your profile to managing your appointments and generating comprehensive reports, this guide will walk you through every step of the way.
We understand the importance of maintaining privacy and security, which is why we have implemented robust measures to protect your personal and client information. Rest assured that your data is encrypted and handled with the utmost care, allowing you to focus on delivering exceptional care while maintaining complete peace of mind.
Thank you for choosing PocketCarer as your trusted companion in your caregiving profession. We are committed to continuously improving our app and providing ongoing support to ensure that you have a seamless experience. So let’s dive in and unlock the full potential of PocketCarer together!
Sincerely,
The PocketCarer Team
The Signup, Signin, and Password Reset Process
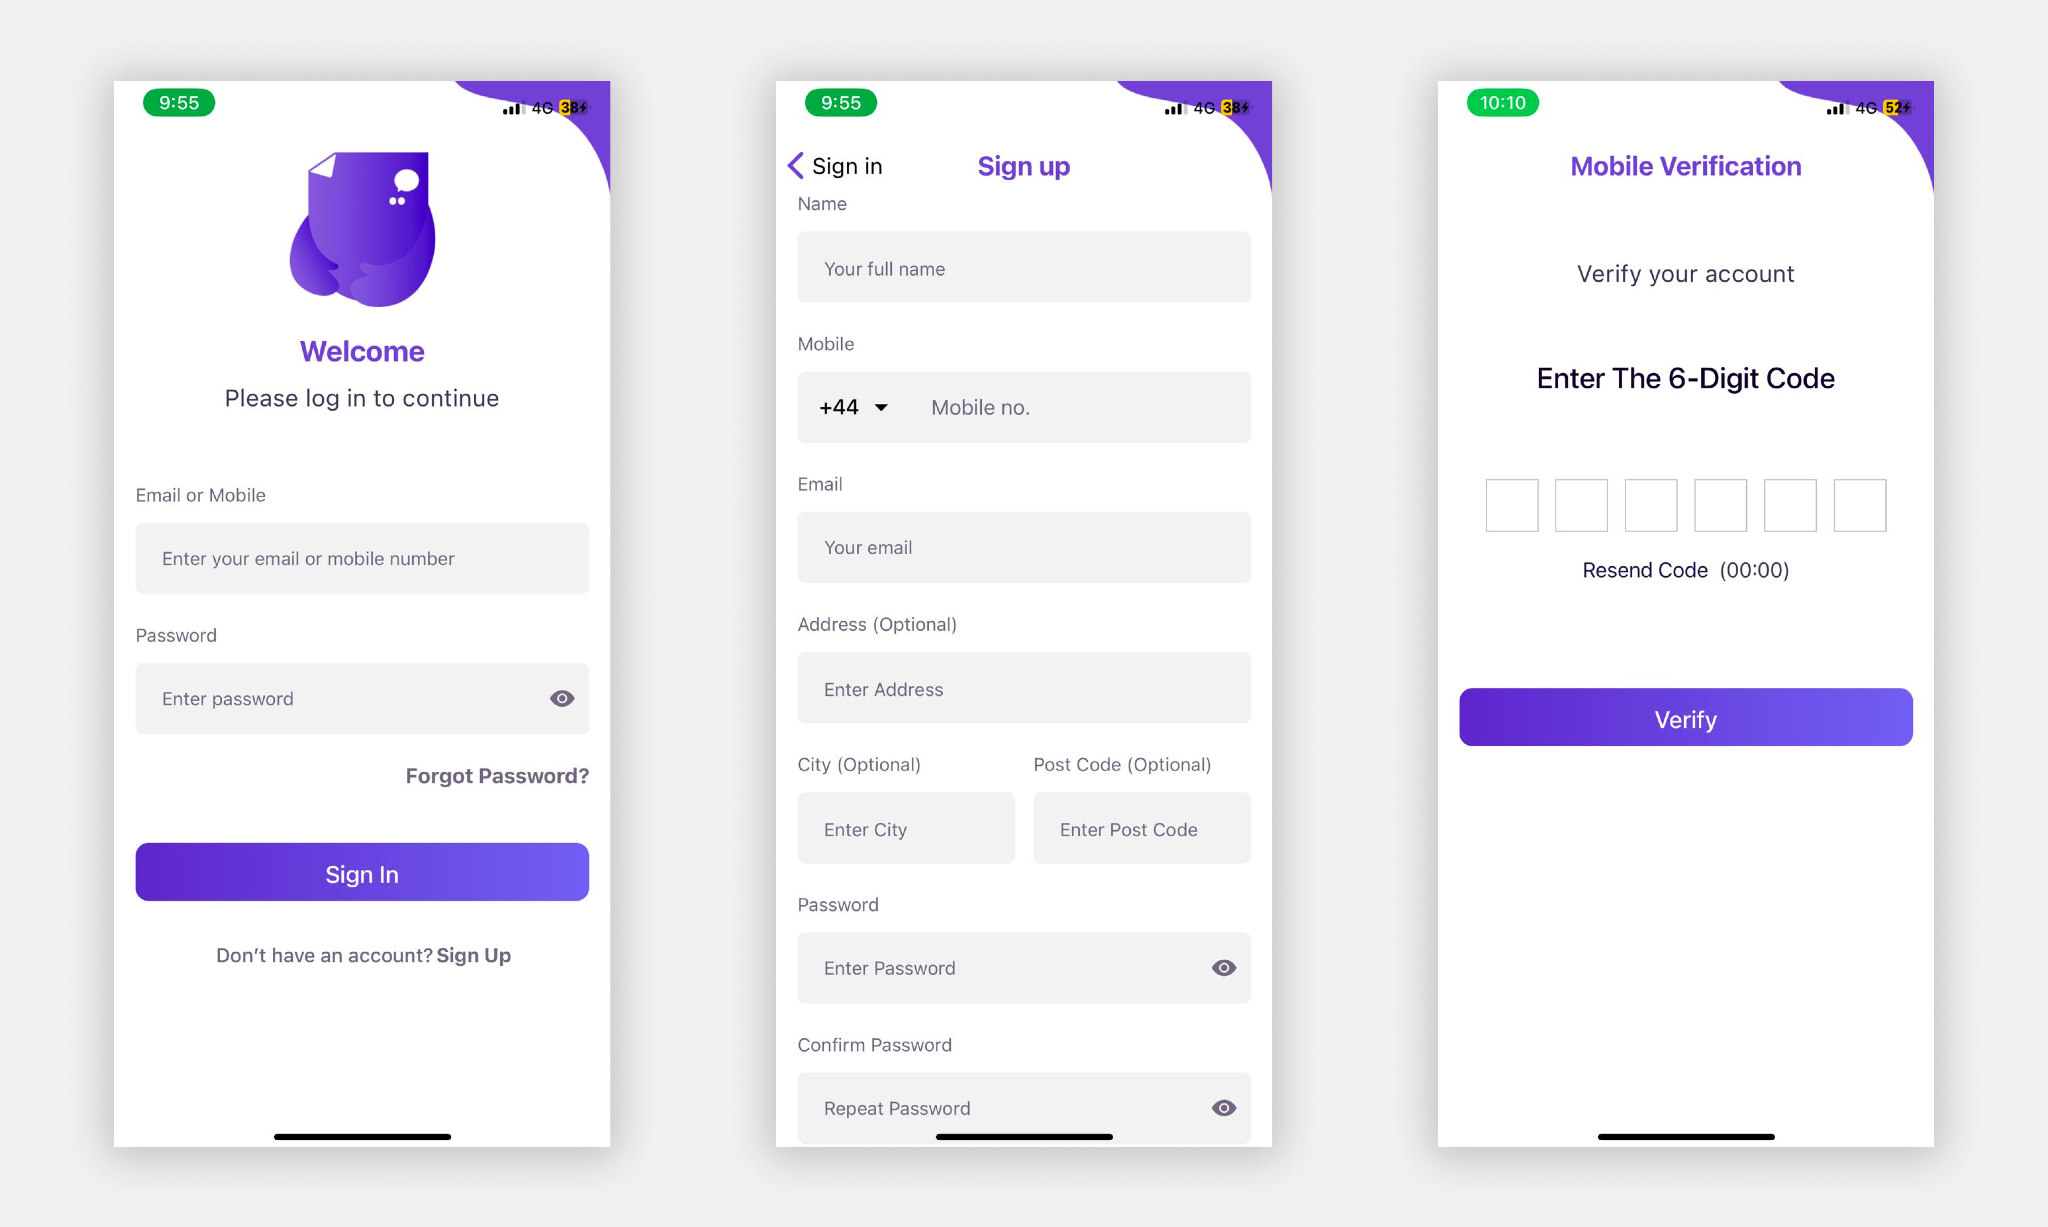
Sign up
Signup in the PocketCarer App is seamless and easy. When you first open the app, It will ask you to enter your email and password to log in. But as a first-time user, you need to register to the PocketCarer App.
Step 1: To do that click on the “Sign Up” link, and it will open the Registration page for you. On this page, you will need to enter your details including Name, Phone Number, Email Address, and Password. The address fields are optional and you can choose if you want to save the information.
Step 2: After you have successfully done step 1, It will show you the next page where you will be asked to enter the 6-digit code that was sent to your phone. If you don’t receive the code within 2 minutes, you can click on the “Resend Code” button to send the code again. Lastly, click type the code and click “Verify”.
If you face a problem during the steps please make sure to contact us at
Sign in
After Successful Registration, The app will take you to the Sign in screen for you to login into your account. Just Type in your email and password that you used when registering and click “Sign In”.

Password Reset
If you have forgotten your password you can very easily reset it. Please follow the step below.
Step 1: Click on the “Forgot Password?” and it will take you to the next page where you will be asked to enter your mobile number. Please enter the mobile number that you used to register your account. When typing the mobile number please make sure you type the country code as well and then type your mobile number and click “Confirm”. For example, If you are using the app from the United Kingdom the country code will be “ +44 ”. So an example number will look like “ +440123456789 ”
Step 2: After you have successfully done step 1, It will show you the next page where you will be asked to enter the 6-digit code that was sent to your phone. If you don’t receive the code within 2 minutes, you can click on the “Resend Code” button to send the code again. Lastly, on the next page, click type the code and type your new password and click “Verify”. It will reset the password for you.
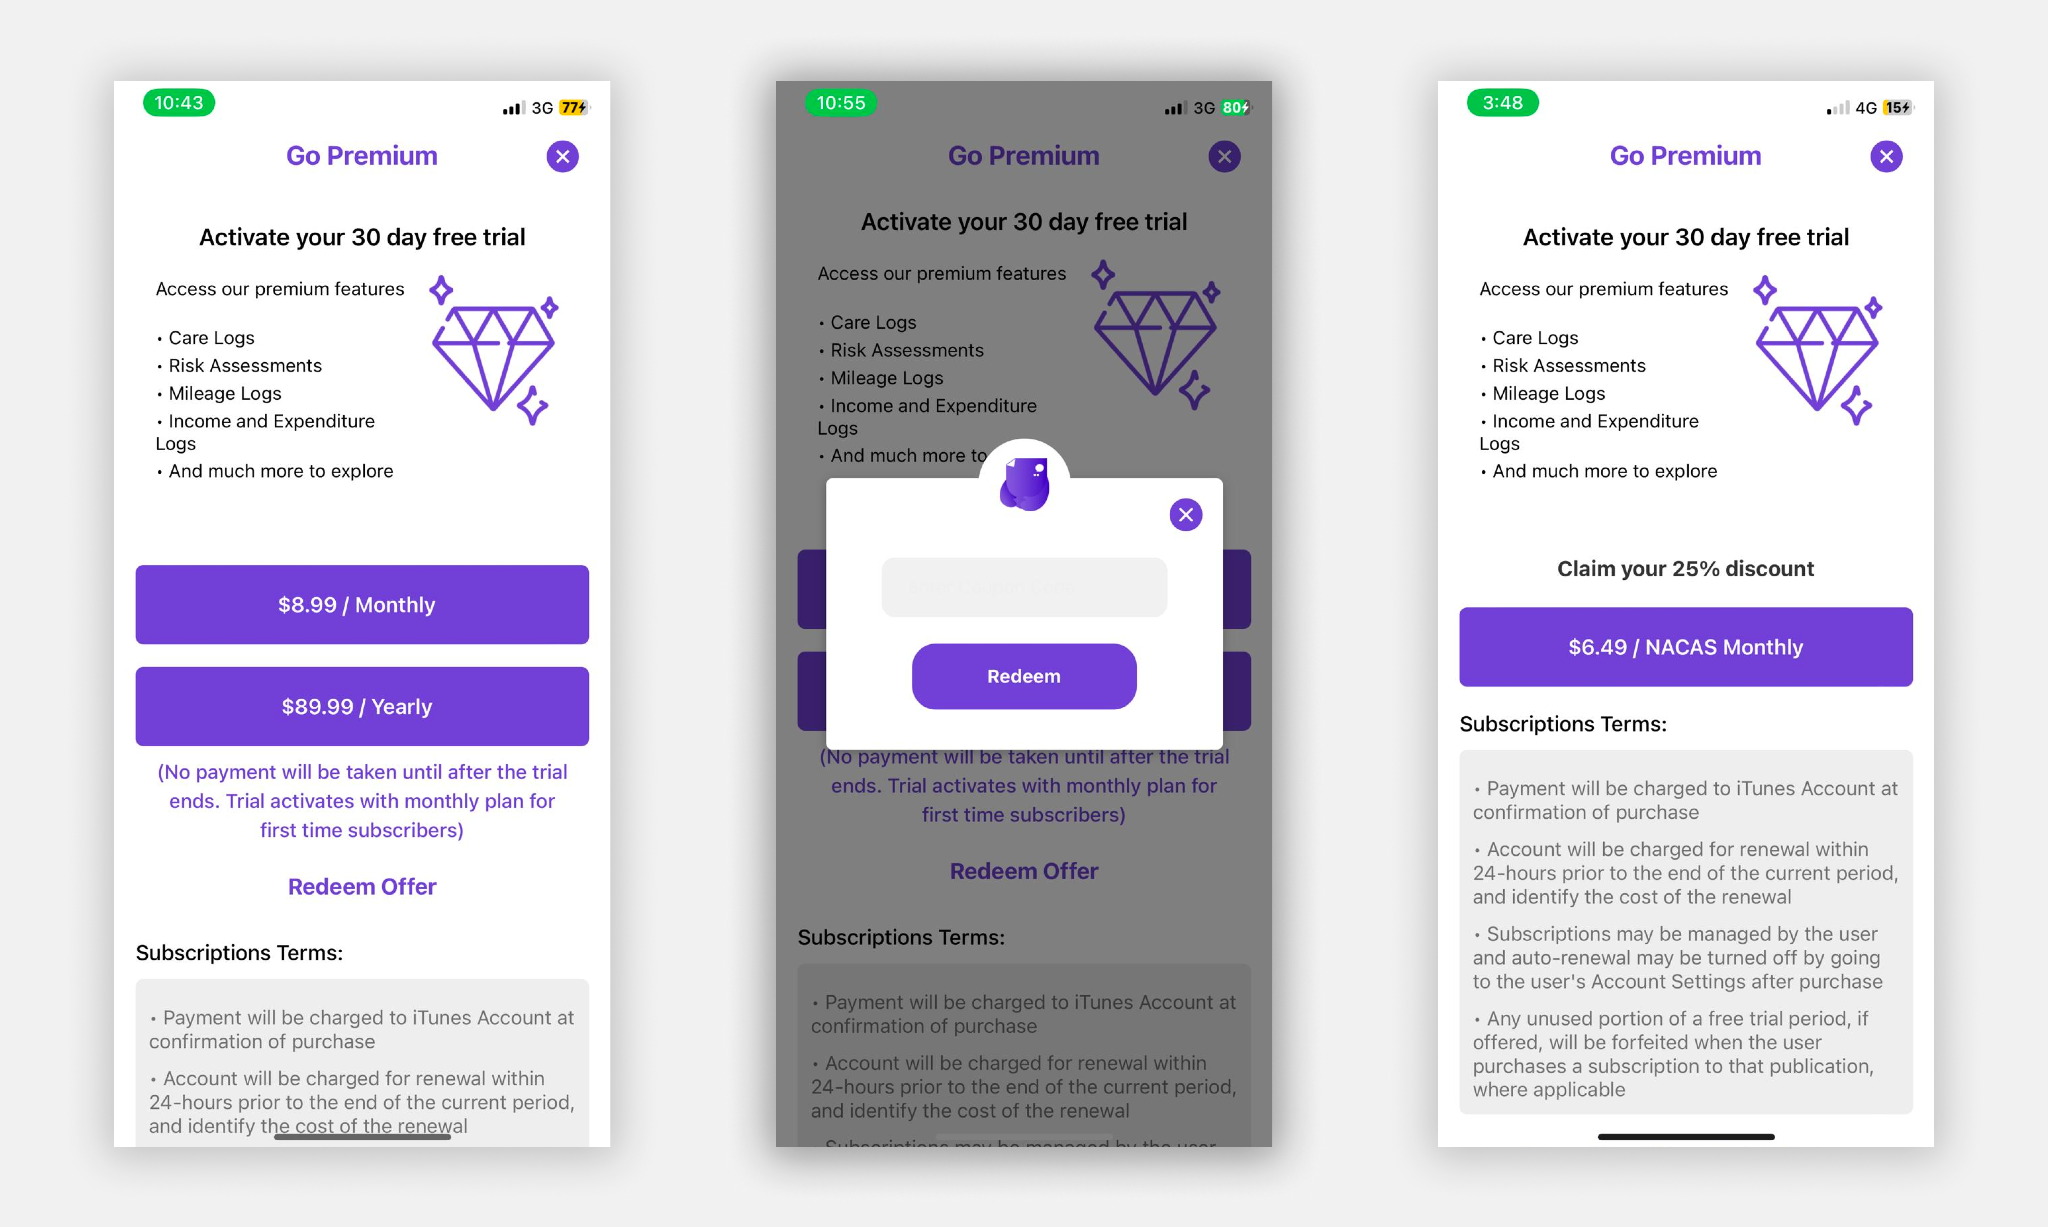
Getting the Subscription
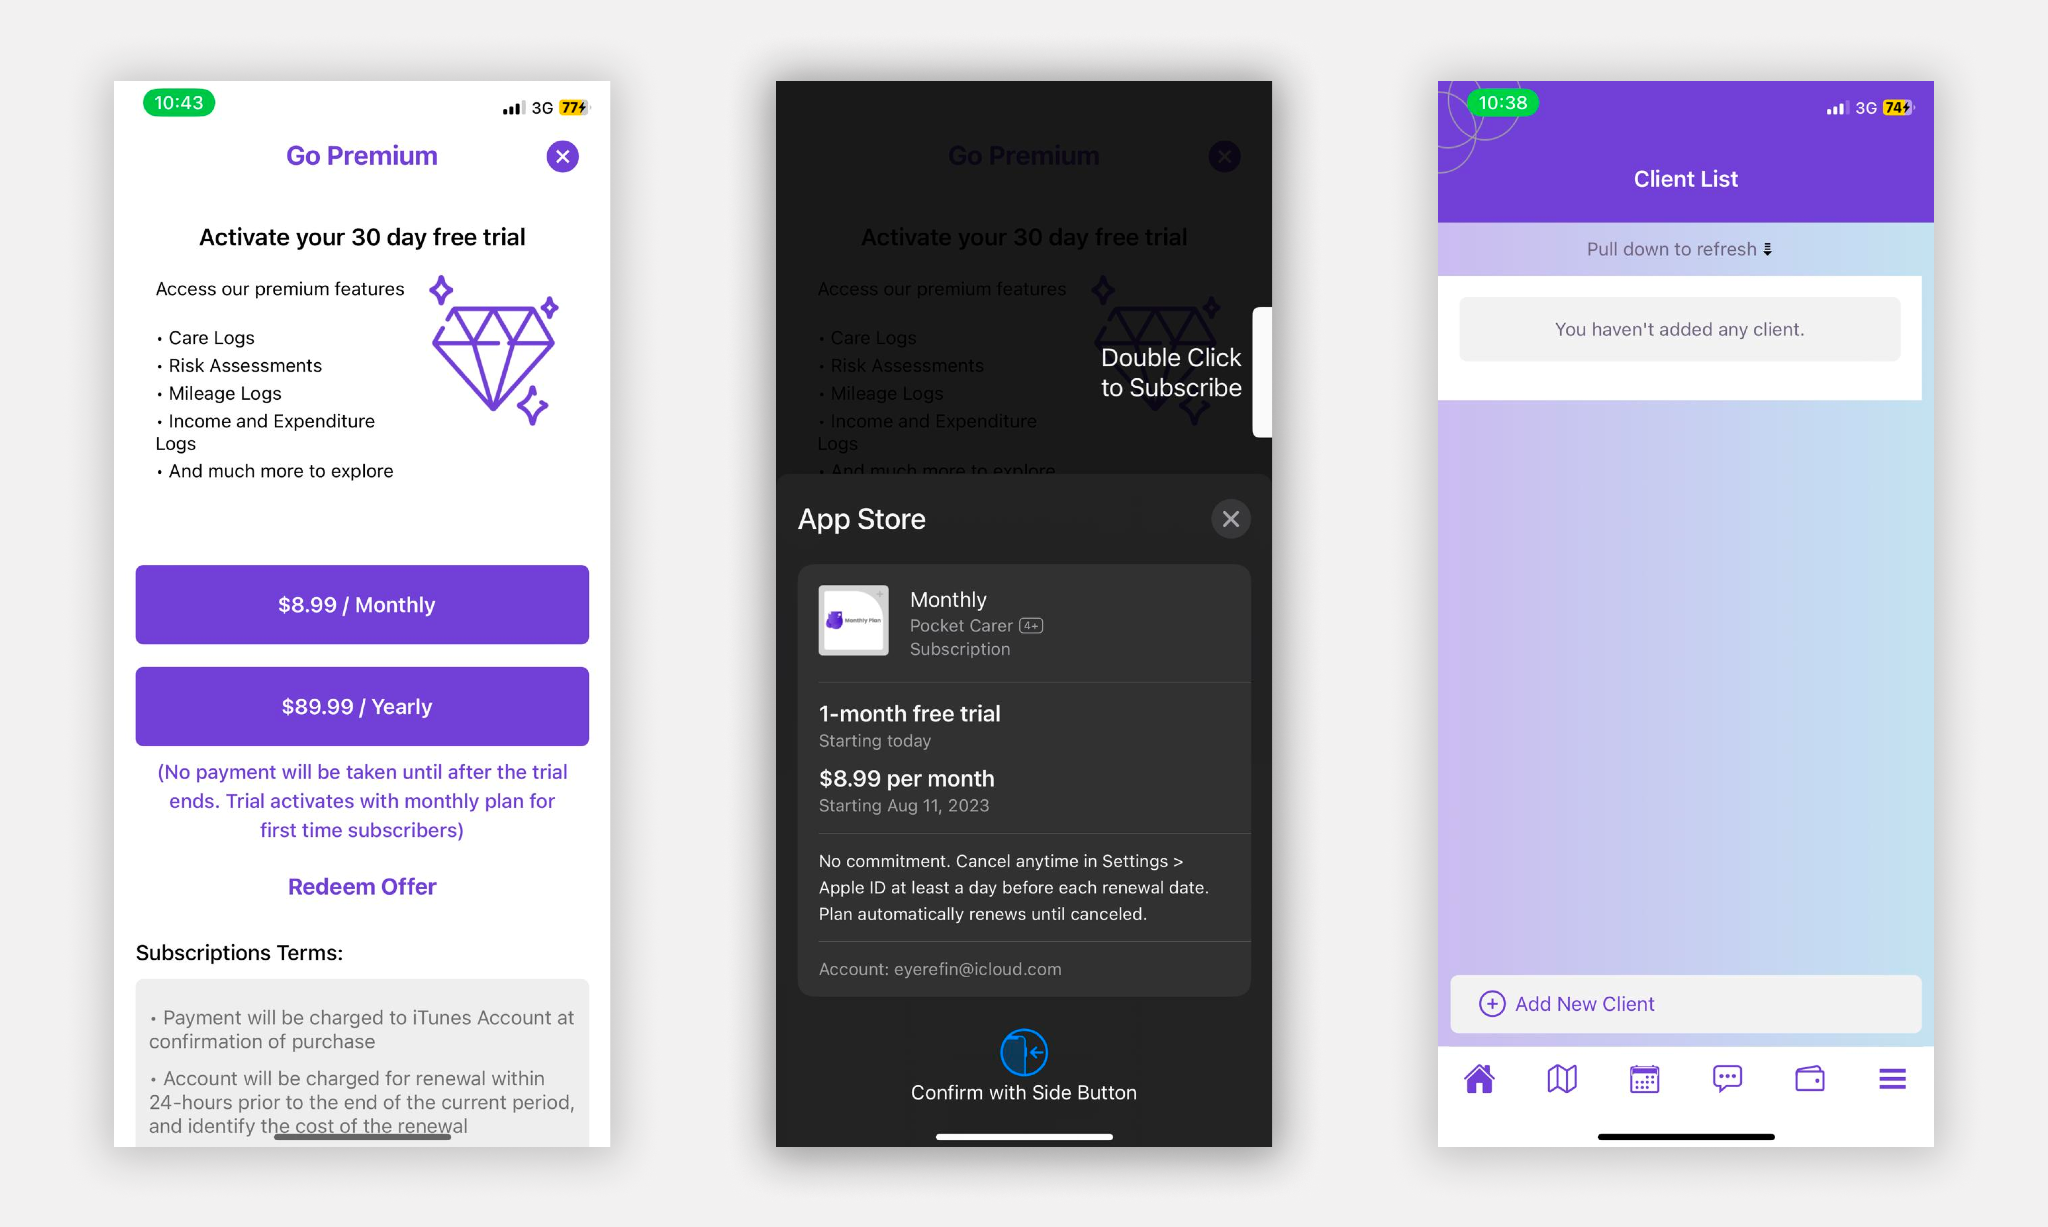
After you log in to your account for the first time it will ask you to get a subscription to PocketCarer. At PocketCarer we offer two pricing packages, One is Monthly and Another is Yearly. Depending on your location you will be seeing the pricing and currency. For example, our Monthly package is set to 7.99 GBP and 8.99 USD.
The monthly subscription comes with a 30-day free trial. You will not be charged immediately for anything. You will only be charged only after the trial of 30 days is completed. If you cancel before the trial ends it will not charge you anything.
Note: The Yearly plan does not come with a 30-day trial.
Get Subscription
To get a subscription click on any of the packages shown to you and you will be asked to confirm the subscription. Depending on the device and platform (iPhone/ Android) you will confirm the subscription according to the steps shown by your phone.
After Successfully getting the subscription you will take to the home screen on PocketCarer.
Redeem a Coupon Code
If you have received a coupon code of PocketCarer you can easily redeem the code when you get the subscription.
To redeem a coupon code click on the “Redeem Offer” button and you will be asked to enter the coupon code.
Type the coupon you received and you will be taken to the discounted rate page.
Mileage
Managing mileage is an essential task for carers who need to keep track of their travel distances for reimbursement or record-keeping purposes. With PocketCarer, you can conveniently and accurately track your mileage directly within the app.
Click on the “Map” (the second icon) icon from the bottom of the PocketCarer app to access the mileage feature.
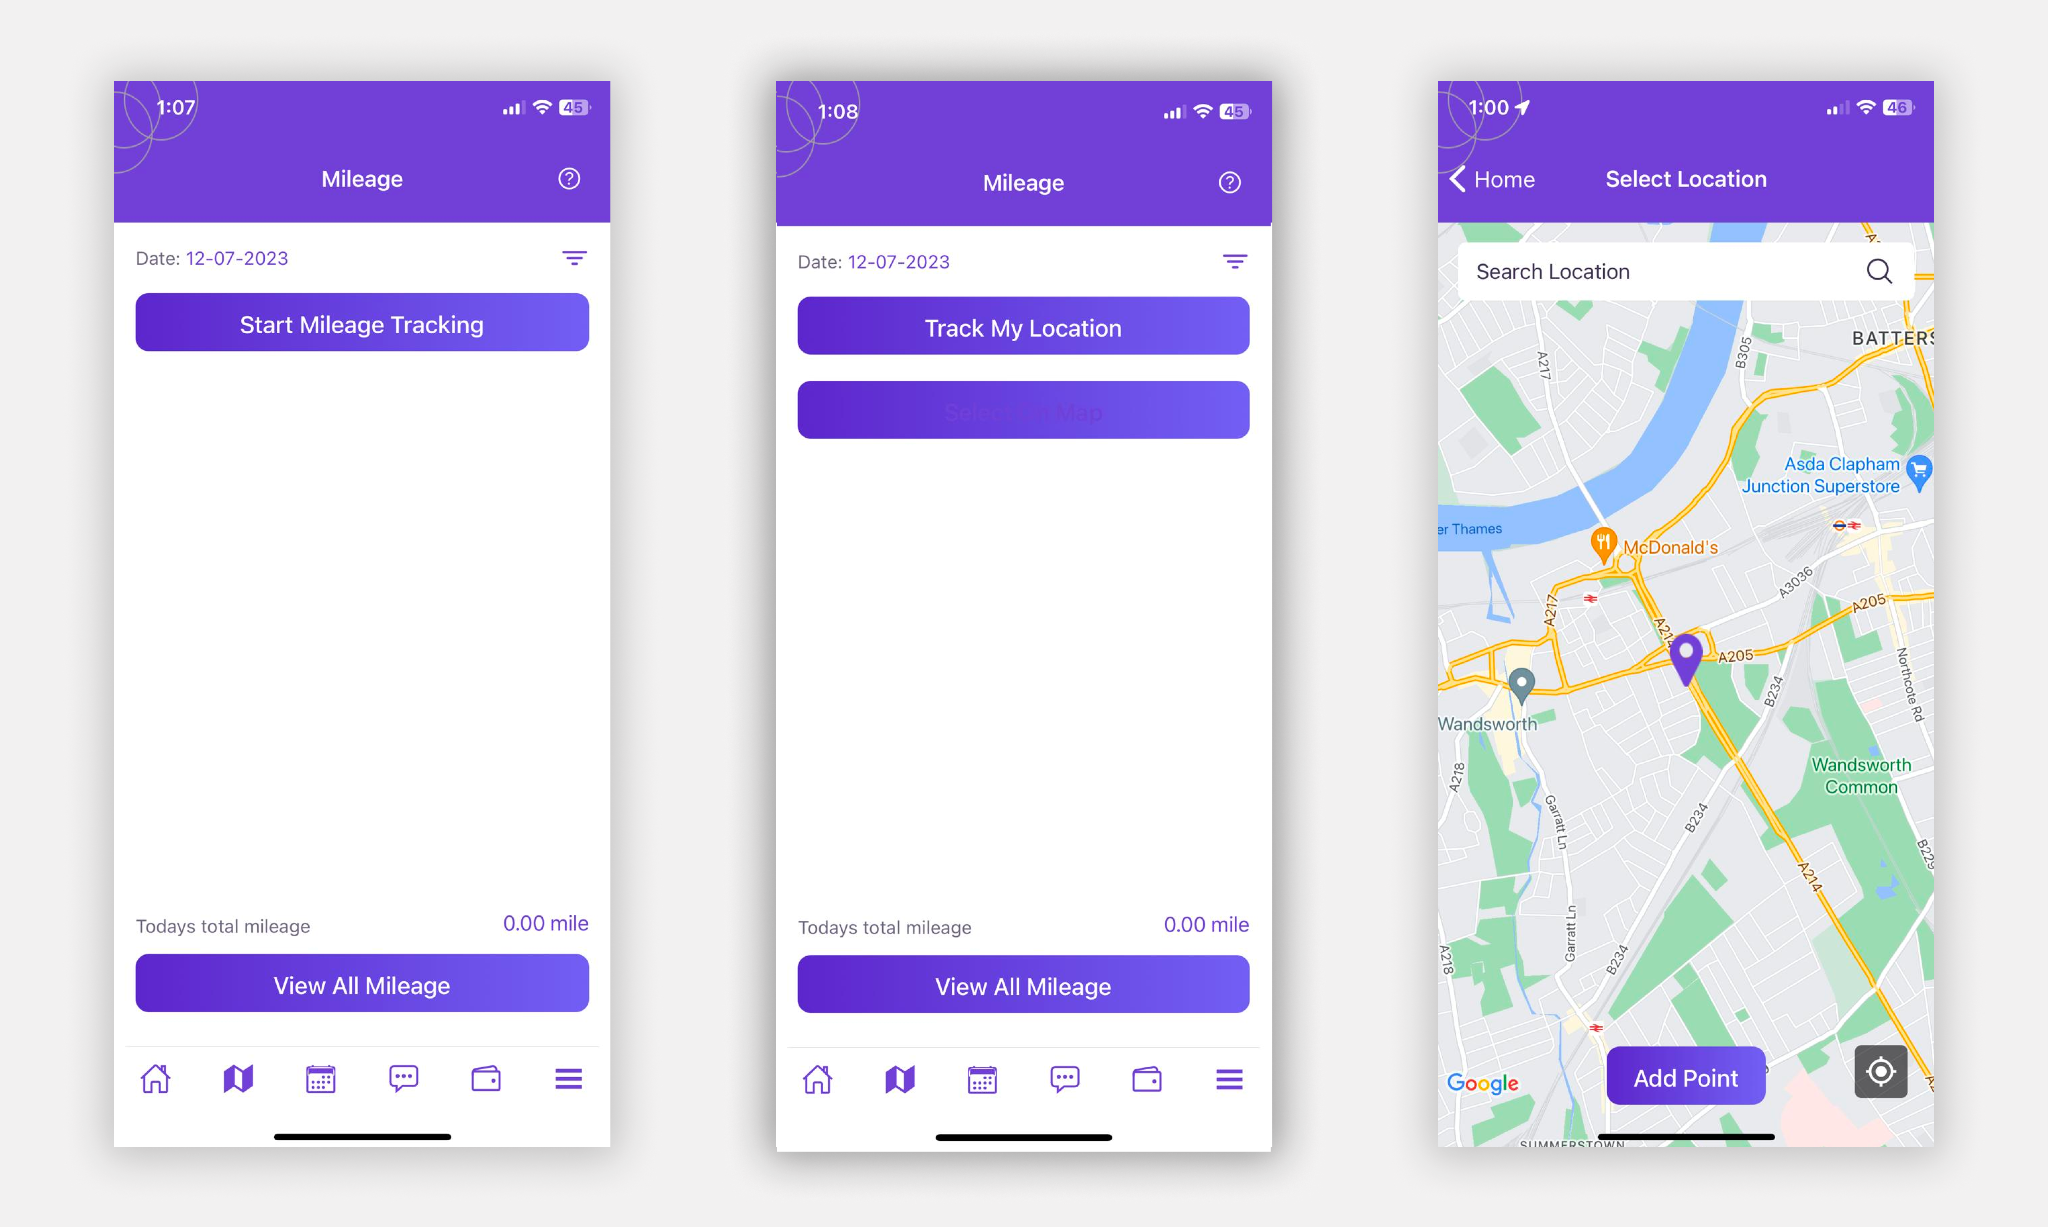
How to use Mileage Tracker
- In the Mileage Tracker section, locate and tap on the “Start Mileage” or a similar button to begin tracking mileage.
- The app will initiate the mileage tracking feature.
- As you travel, the app will keep track of the distance covered.
- When you reach each stop or destination, manually tap on the “Track My Location” button to track the current spot
- Alternatively, go to the “Select on Map” map, and from there you can select the stop location on the map by tapping on the corresponding area.
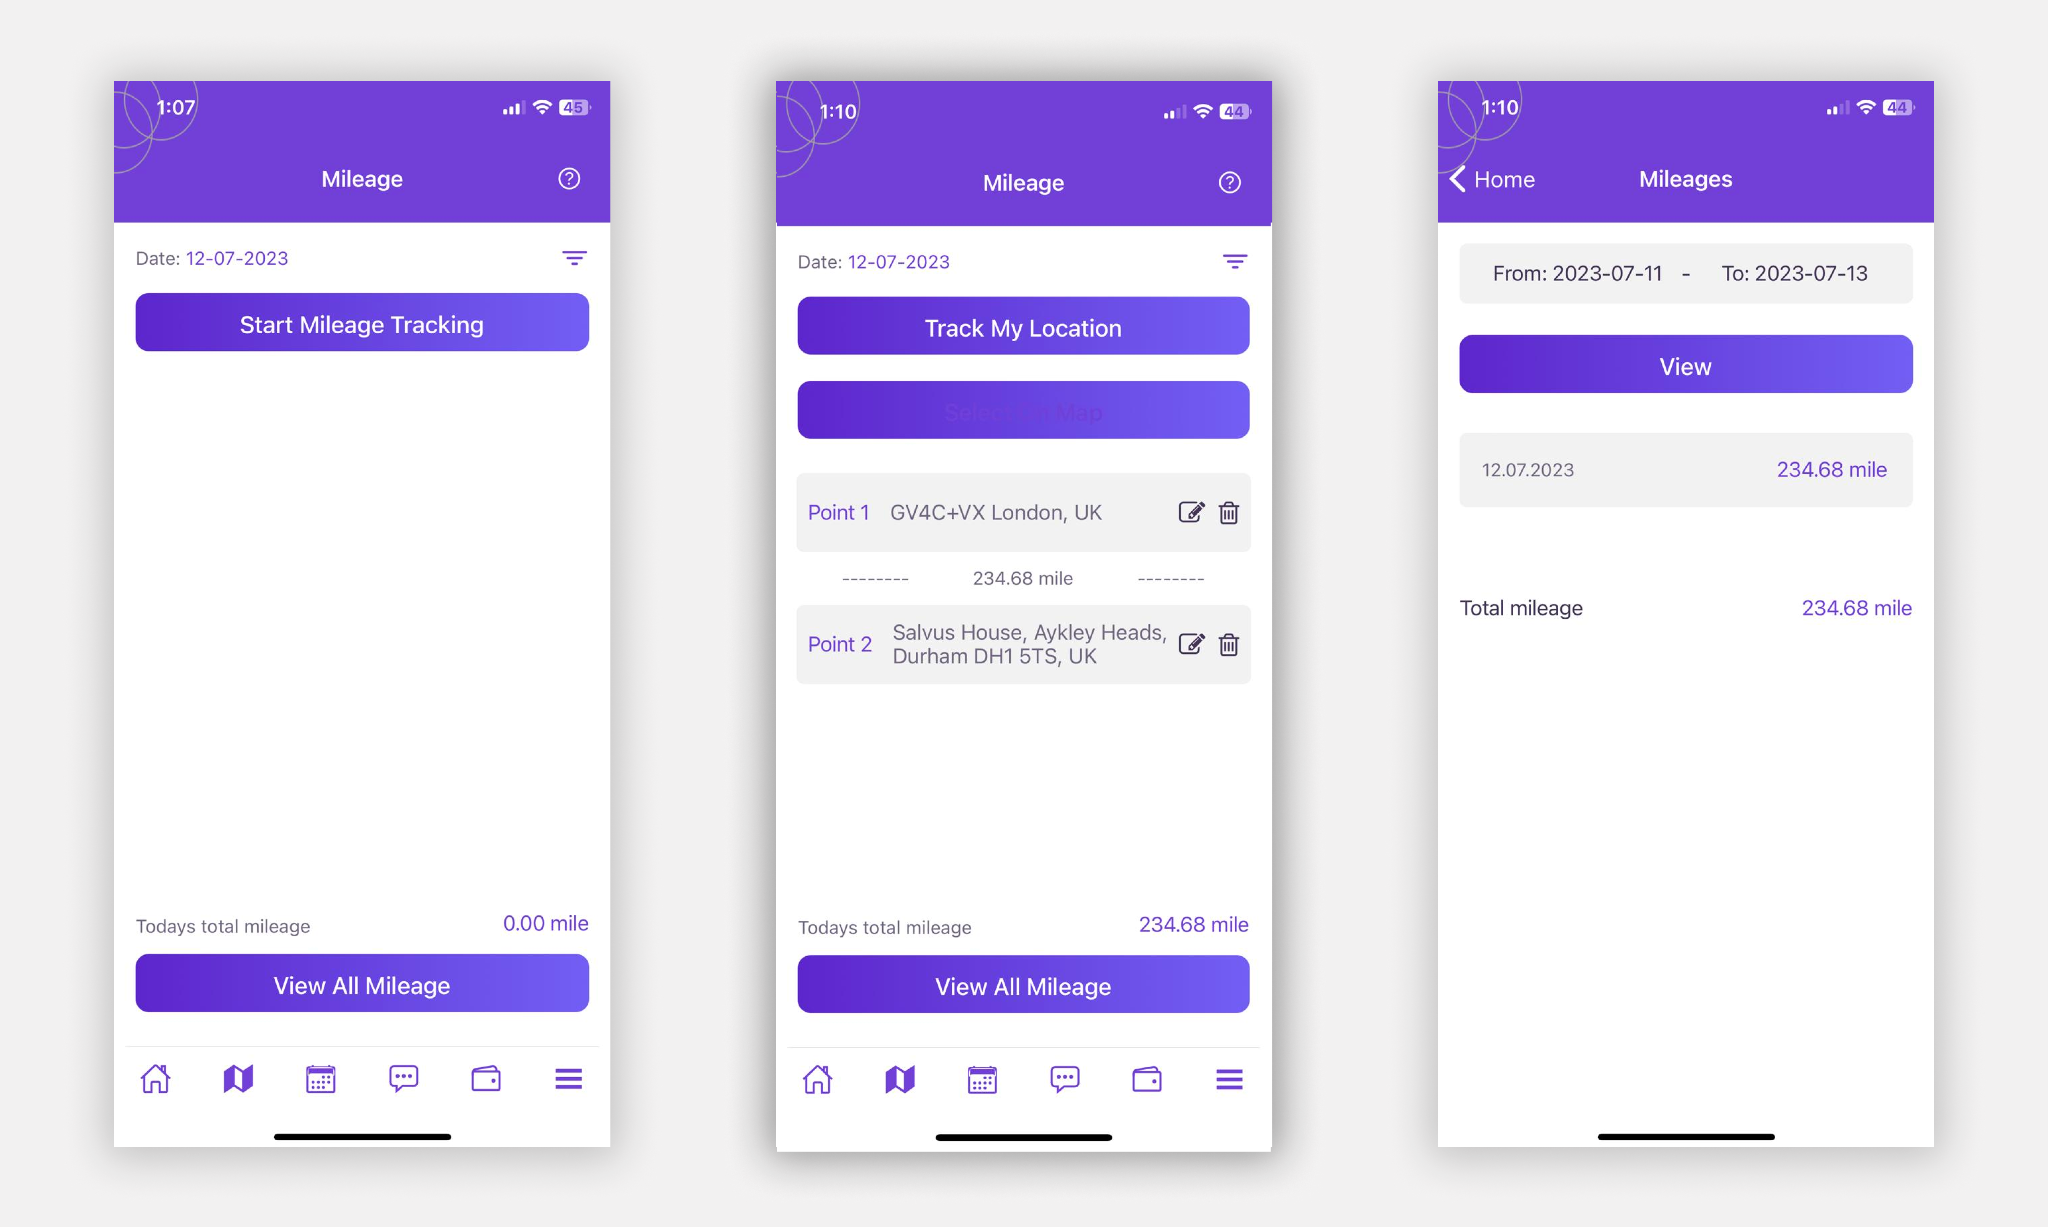
The daily total mileage will show at the bottom of the page. If you want to view a previous date mileage then you can use the date selector to select the specific date.
If you want to view the mileage of a specific date range, for example, the last 30 days, you can click on “View All Mileage” and click the “Select Date’ button to select a start and end date. It will show you every day’s total mileage and at the end, it will calculate the total mileage in the select time duration.
You can also click on each date to view the detailed mileage on that specific date.
Calendar
The PocketCarer Calender feature lets you the option to add events to your calendar. It will show you everyday events that you have set previously.
To access the PocketCarer Calender click on the “Calendar” icon (the third icon) icon from the bottom of the PocketCarer app.
How to use the Calendar
On the calendar page you will see a calendar and underneath that, you will see all your saved events. To add an event, click on the “ + ” (the plus icon) at the top right corner of the calendar page and fill out the form with the information.
The form information includes,
- Date
- Start and End time
- Title
- Description
After filling out the form click “Add” to add the event to your calendar.
Messages
The PocketCarer Messages feature lets you the option to chat with the family member of a client. When you send an invite request to a relative, (explained in the relative feature) and download the PocketCarer Relatives app, create an account, and accept the invite request a chat option will be automatically created for you to communicate within the app with the family member.
When you add multiple relatives for a client it will create a group chat as well to communicate with all the family members.
Click on the “Message” (the fourth icon) icon from the bottom of the PocketCarer app to access the messages feature.
Accounts (Income/ Expense Manager)
This powerful feature is designed to assist you in effectively managing your financial transactions, income, and expenses related to your caregiving business. With the Account Manager, you can conveniently track and monitor your financial activities, ensuring a clear overview of your financial health.
Whether you are a self-employed carer or running a caregiving business, it is essential to keep accurate records of your income and expenses. PocketCarer’s Account provides you with a user-friendly interface to enter and categorize your financial transactions, making it easier to understand and analyze your financial situation.
To access the PocketCarer Calender click on the “wallet” icon (the fifth icon) icon from the bottom of the PocketCarer app.
Adding an Income
On the “Income Tab” click on the “Add Income” button and fill out the information with Amount, a Description, and a date. You can also upload a receipt for record keeping.
Adding an Expense
On the “Expense Tab” click on the “Add Expense” button and fill out the information with the Amount, a Description, and a date. You can also upload a receipt for record keeping.
You can also download a PDF report. To do that click on the date selector and select the start and end date and click on the “Download” button.
Adding and Managing a Client
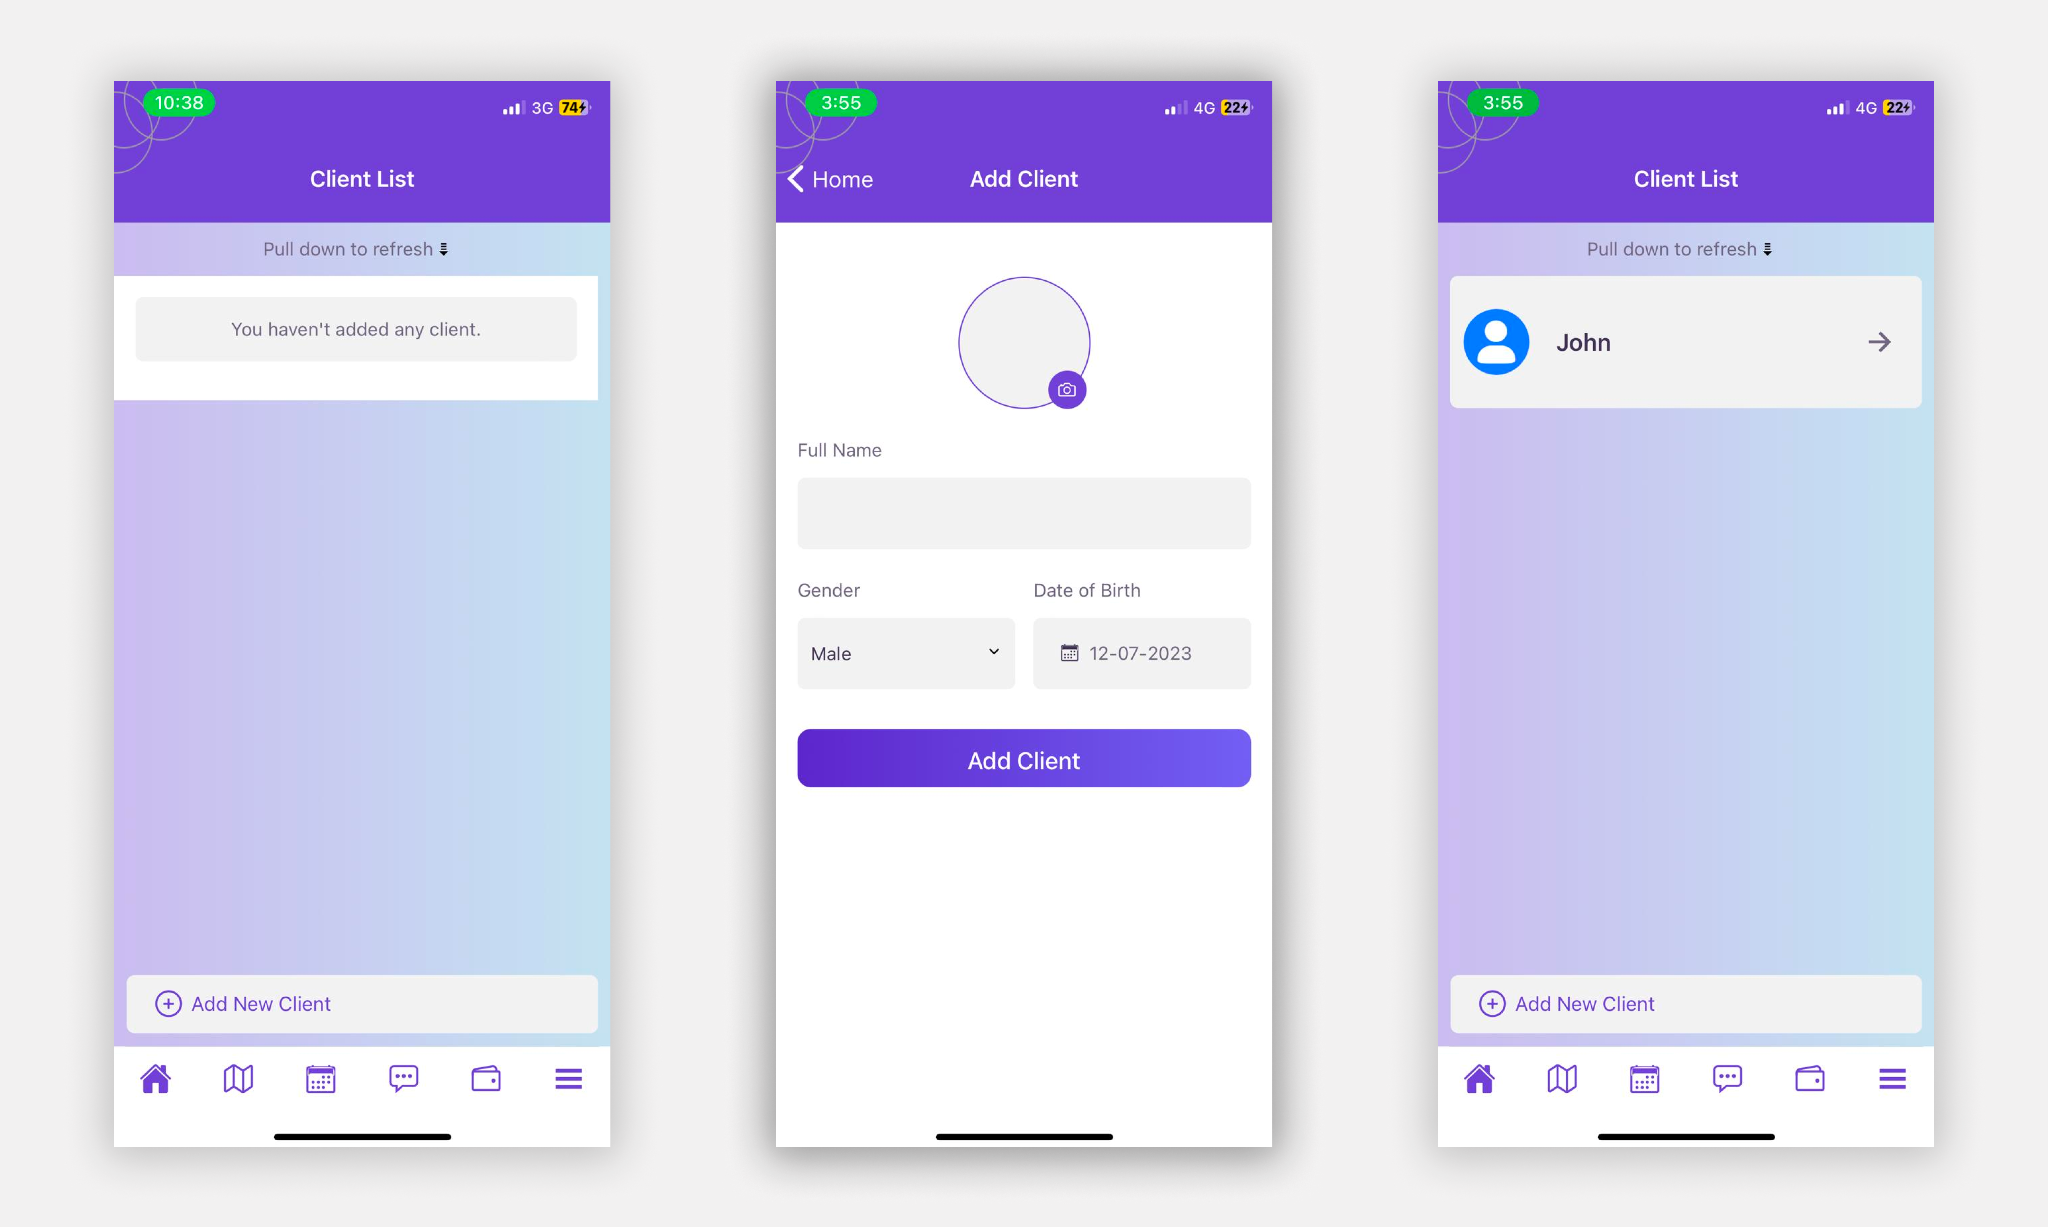
After you have successfully subscribed to the PocketCarer app all the features will be unlocked for you.
Step 1: The first step to use all the app features will be to add a client. To do that click on the “Add New Client” button at the bottom of the screen.
Step 2: Fill in the client information like Name of the client, Gender, and Date of birth, and click “Add Client”
This will add a client into your account, and to access all the features click on the client name. On the Client Information page you will find all the features available to track your care logs efficiently. |
|---|
1: Daily Log
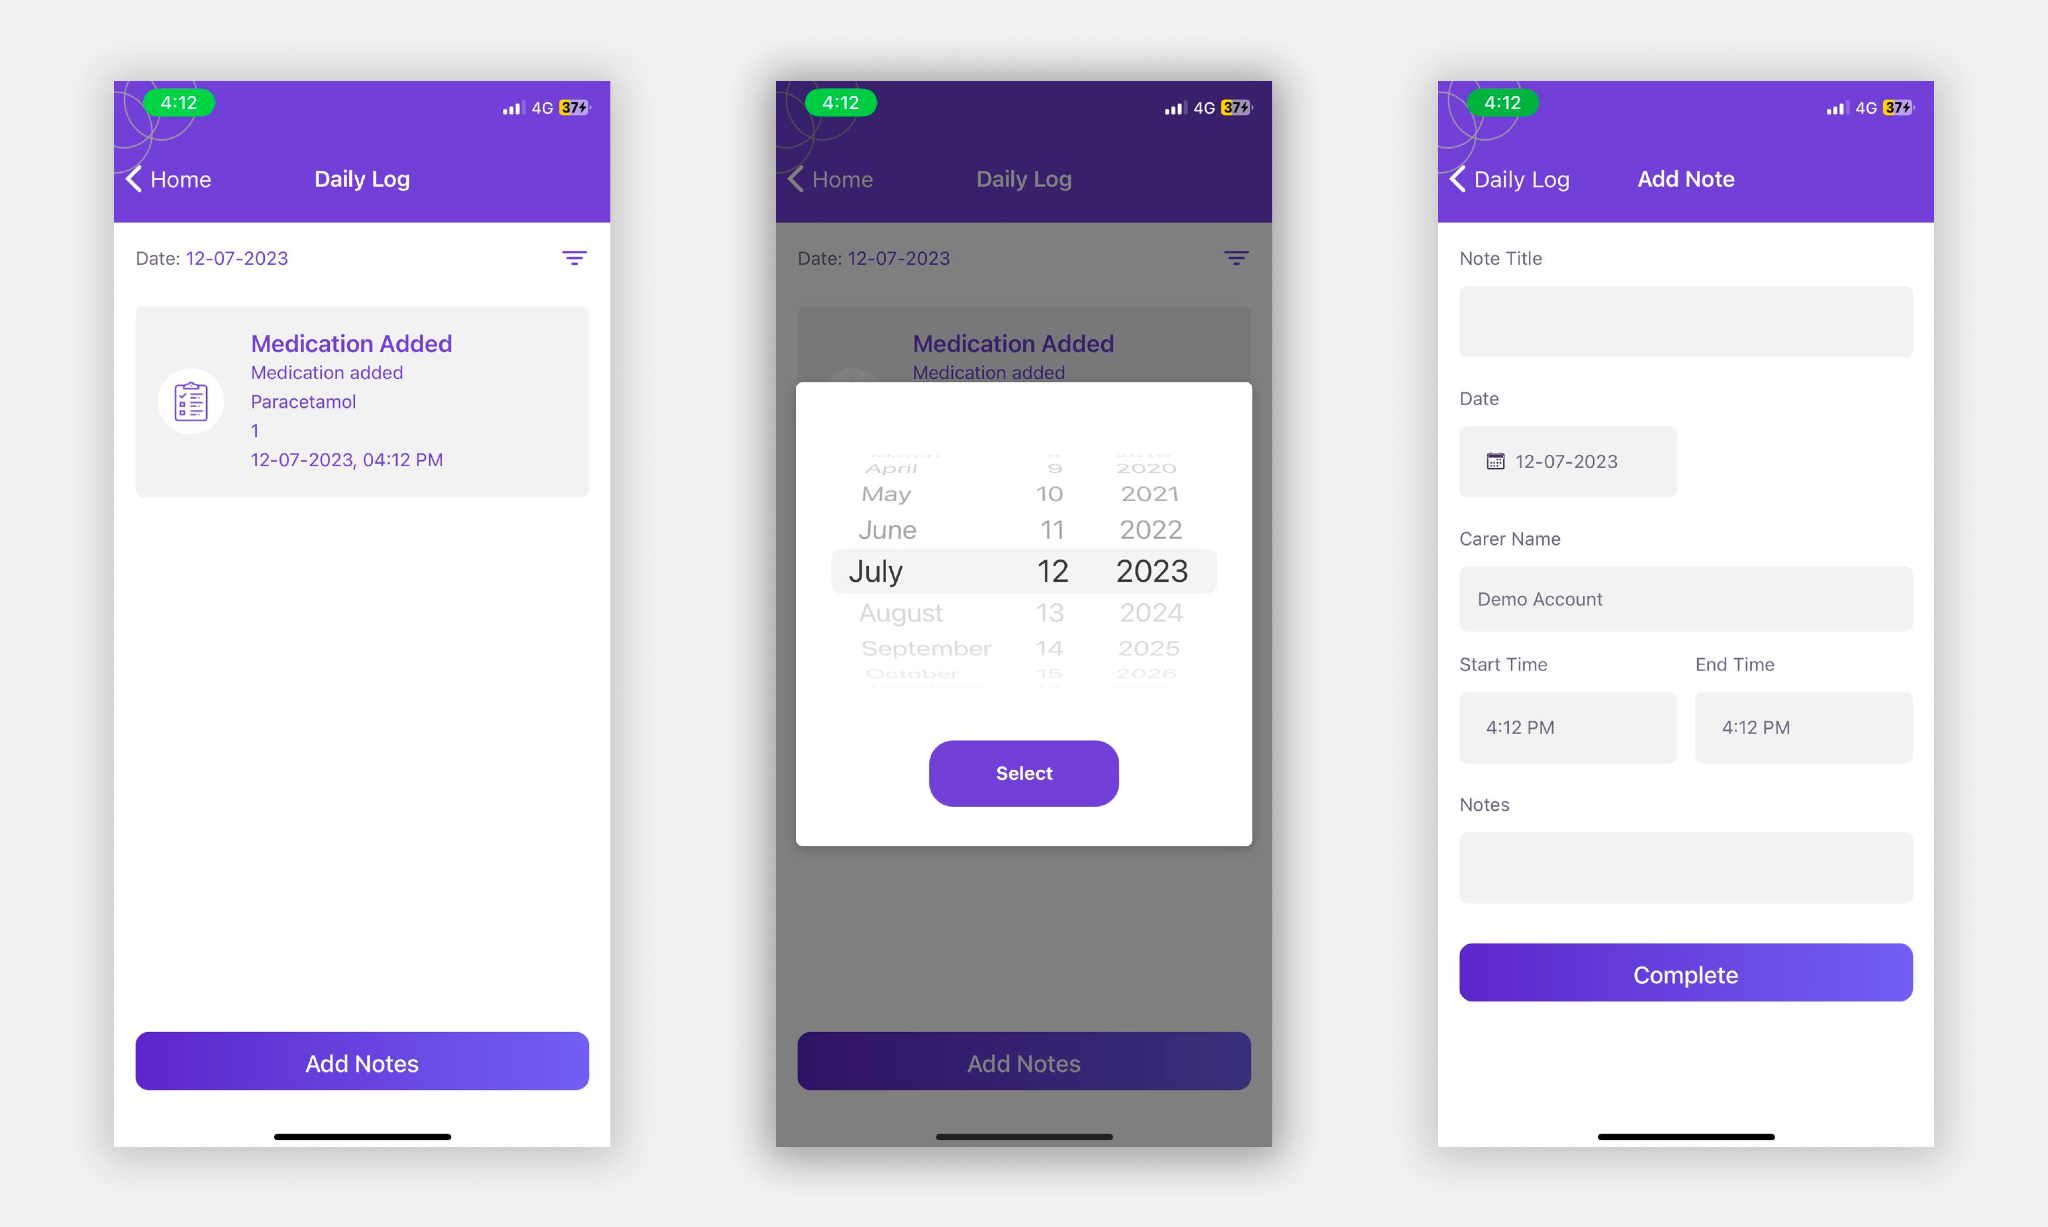
The Daily Log page saves every event and action you perform for the client. For example if you add a medication for the client it will show in the daily log page or if you add a Risk Assesment it will also save the log. The events are captured from all the action you take when you are using any of the available features.
Daily Logs are displayed on daily basis, Which means you will see the logs for the current date. If you want to view logs of any previous date, you can use the date filter option and select the date you want to view the logs for.
There is another very useful option in the daily logs, which is the “Notes” feature. You can add daily notes for the client.
To create a note click on the “Add Note” button and fill out the form and click “Complete” It will save the log for the client on the specific date.
You can also use the Start and End time in the note feature to define the time took to perform a certain task.
For example, you have performed a task for a client which is needed to be logged with time. You can do that very easily with daily note.
2: Medication
The medication features gives you the ability to track a client’s medications and intake time and creates logs.
Adding a Medication
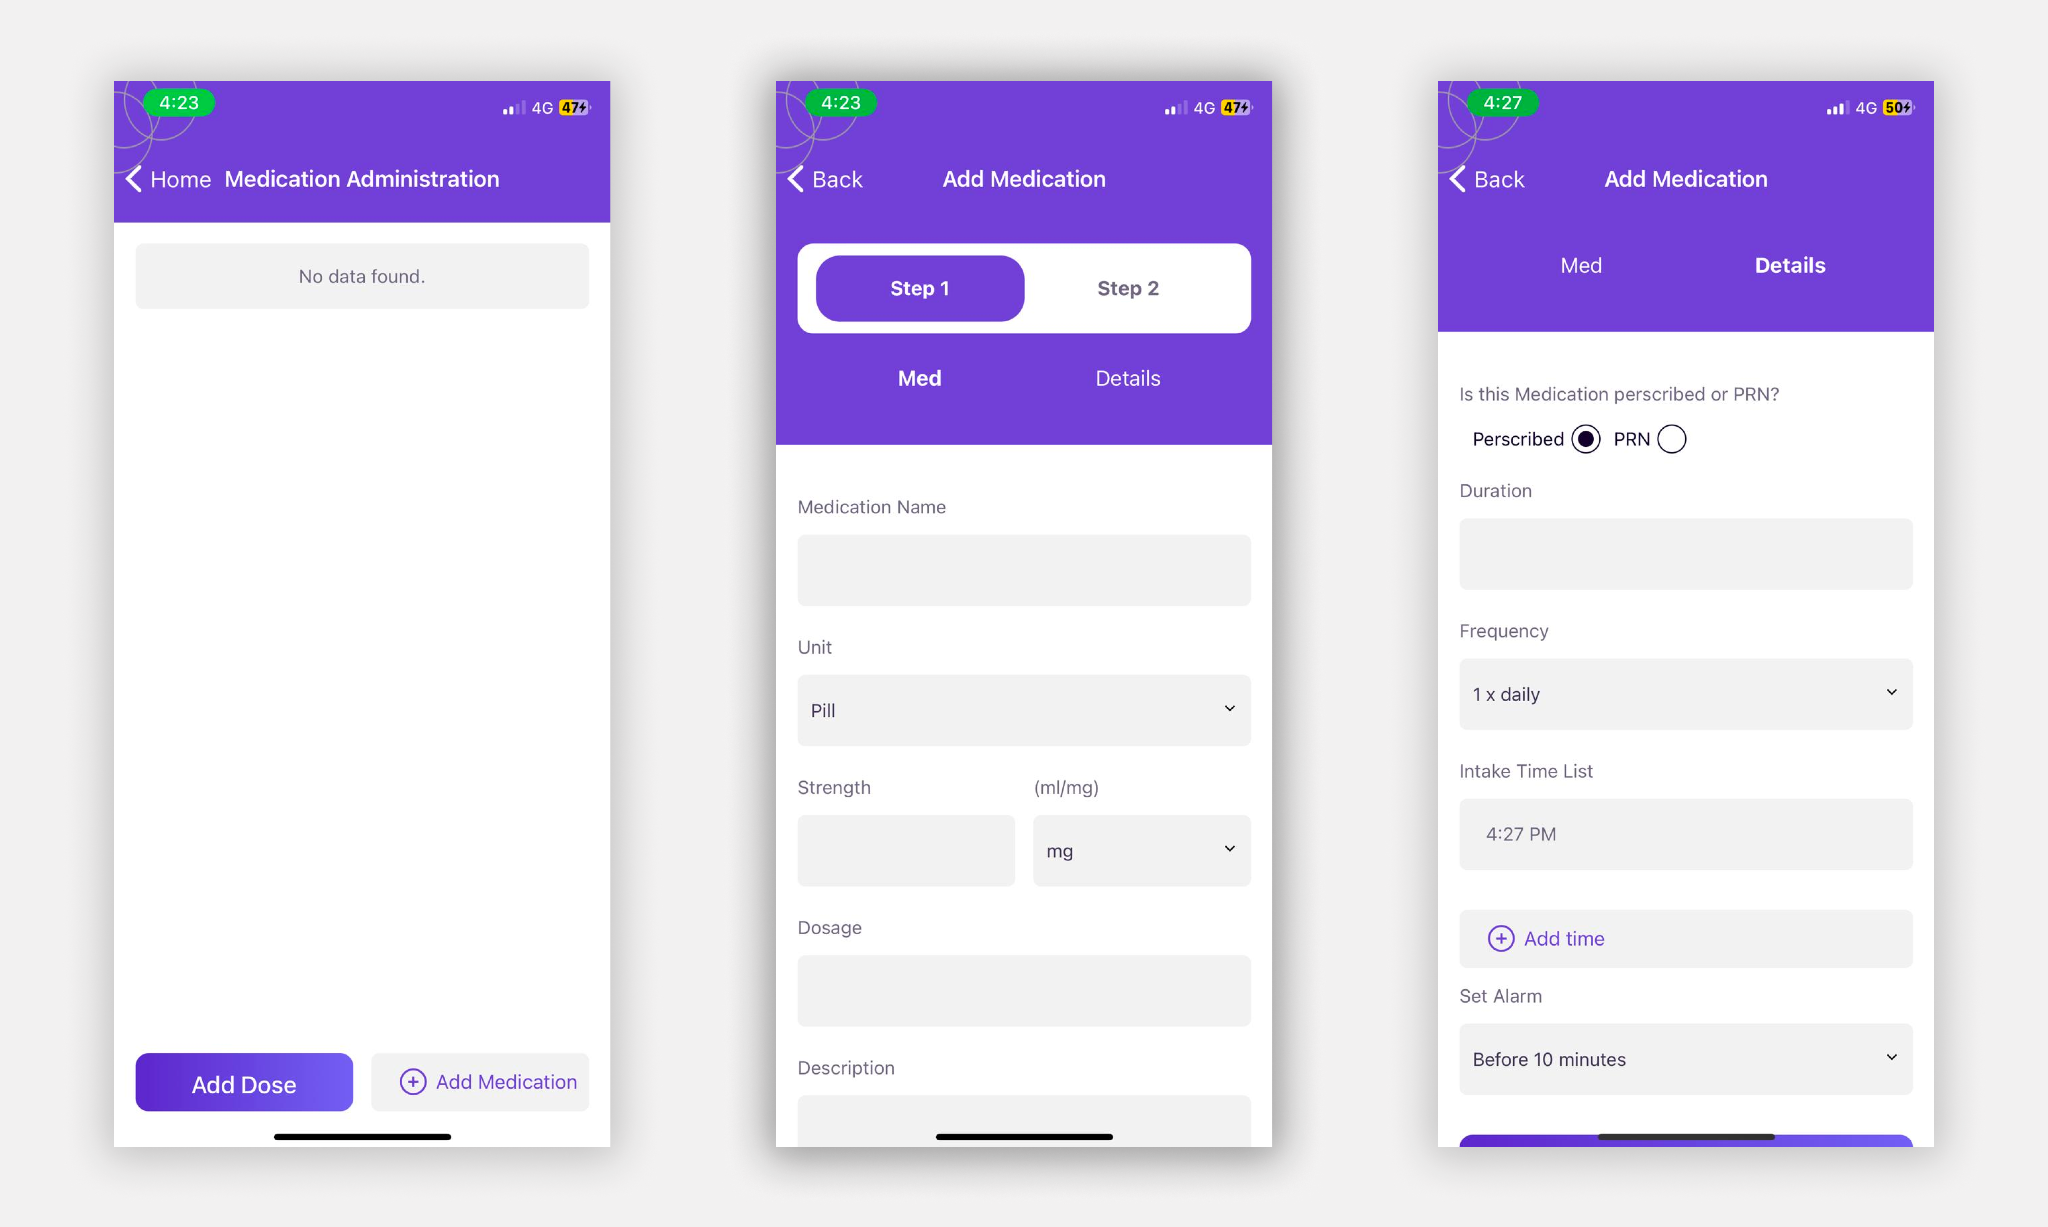
Step 1: To add a medication for a client click on the “Add Medication” button and fill out the form on the first step with information like Medication name, Unit type, Strength, Dosage etc and click “Next”.
Step 2: On the second page you can enter the details of the medication and intake times. You can also set an alarm to remind you to give the medication on time to the client. You can select the reminder time as well. After filling in all the information click on the “Complete” button to save the medication.
Adding a Dose
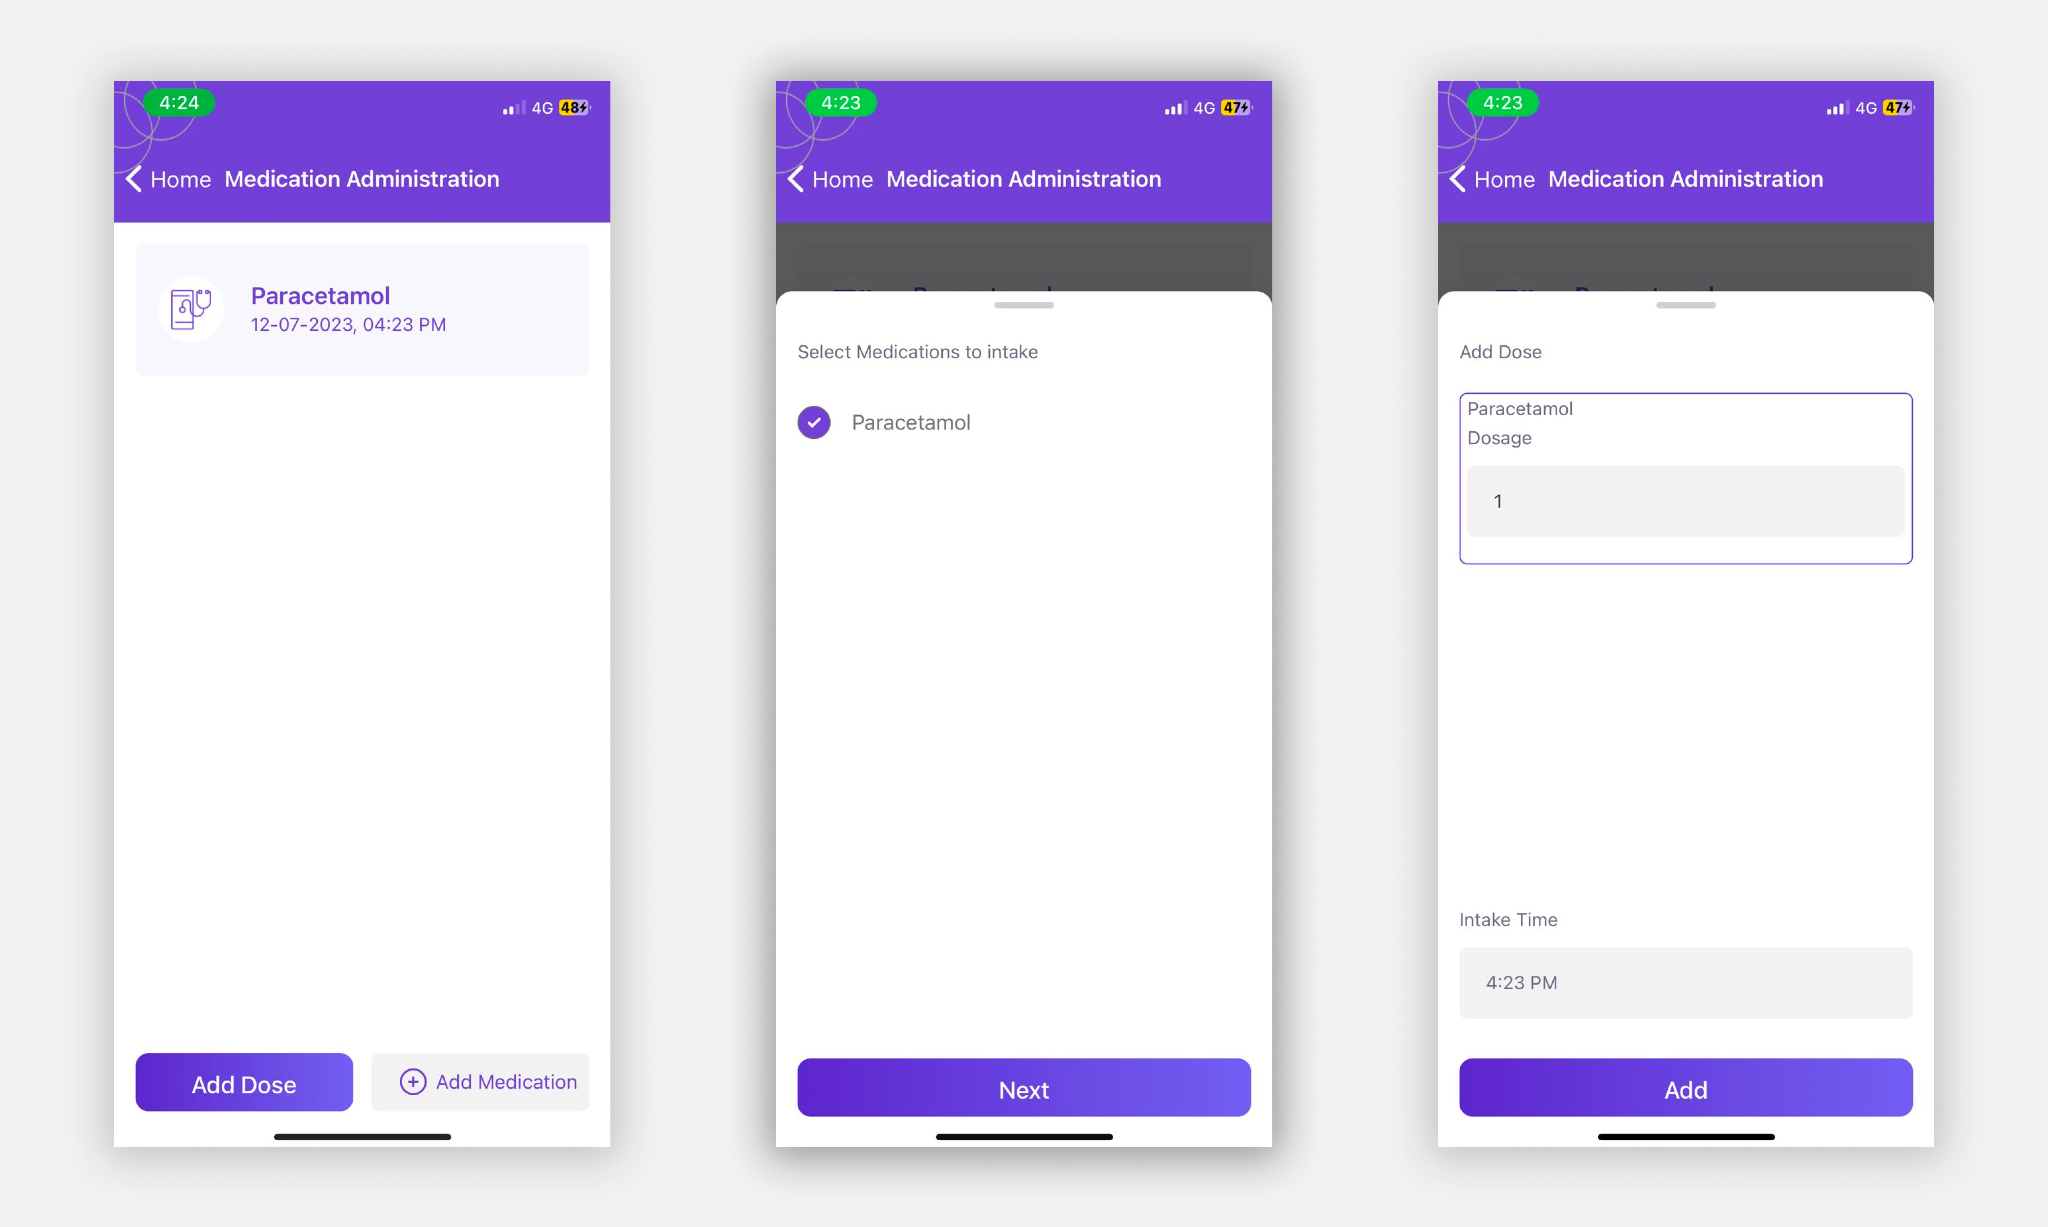
Step 1: To add a dose of a medication for the client click on the “Add Dose” button and select the medication and click “Next”.
Step 2: On the next step type the dosage and intake time and click “Add” to add the dosage. By default, the dosage will be the amount that you have specified when adding the medication and intake time will be the current time.
View/ Edit/ Download/ Send/ Delete a Medication
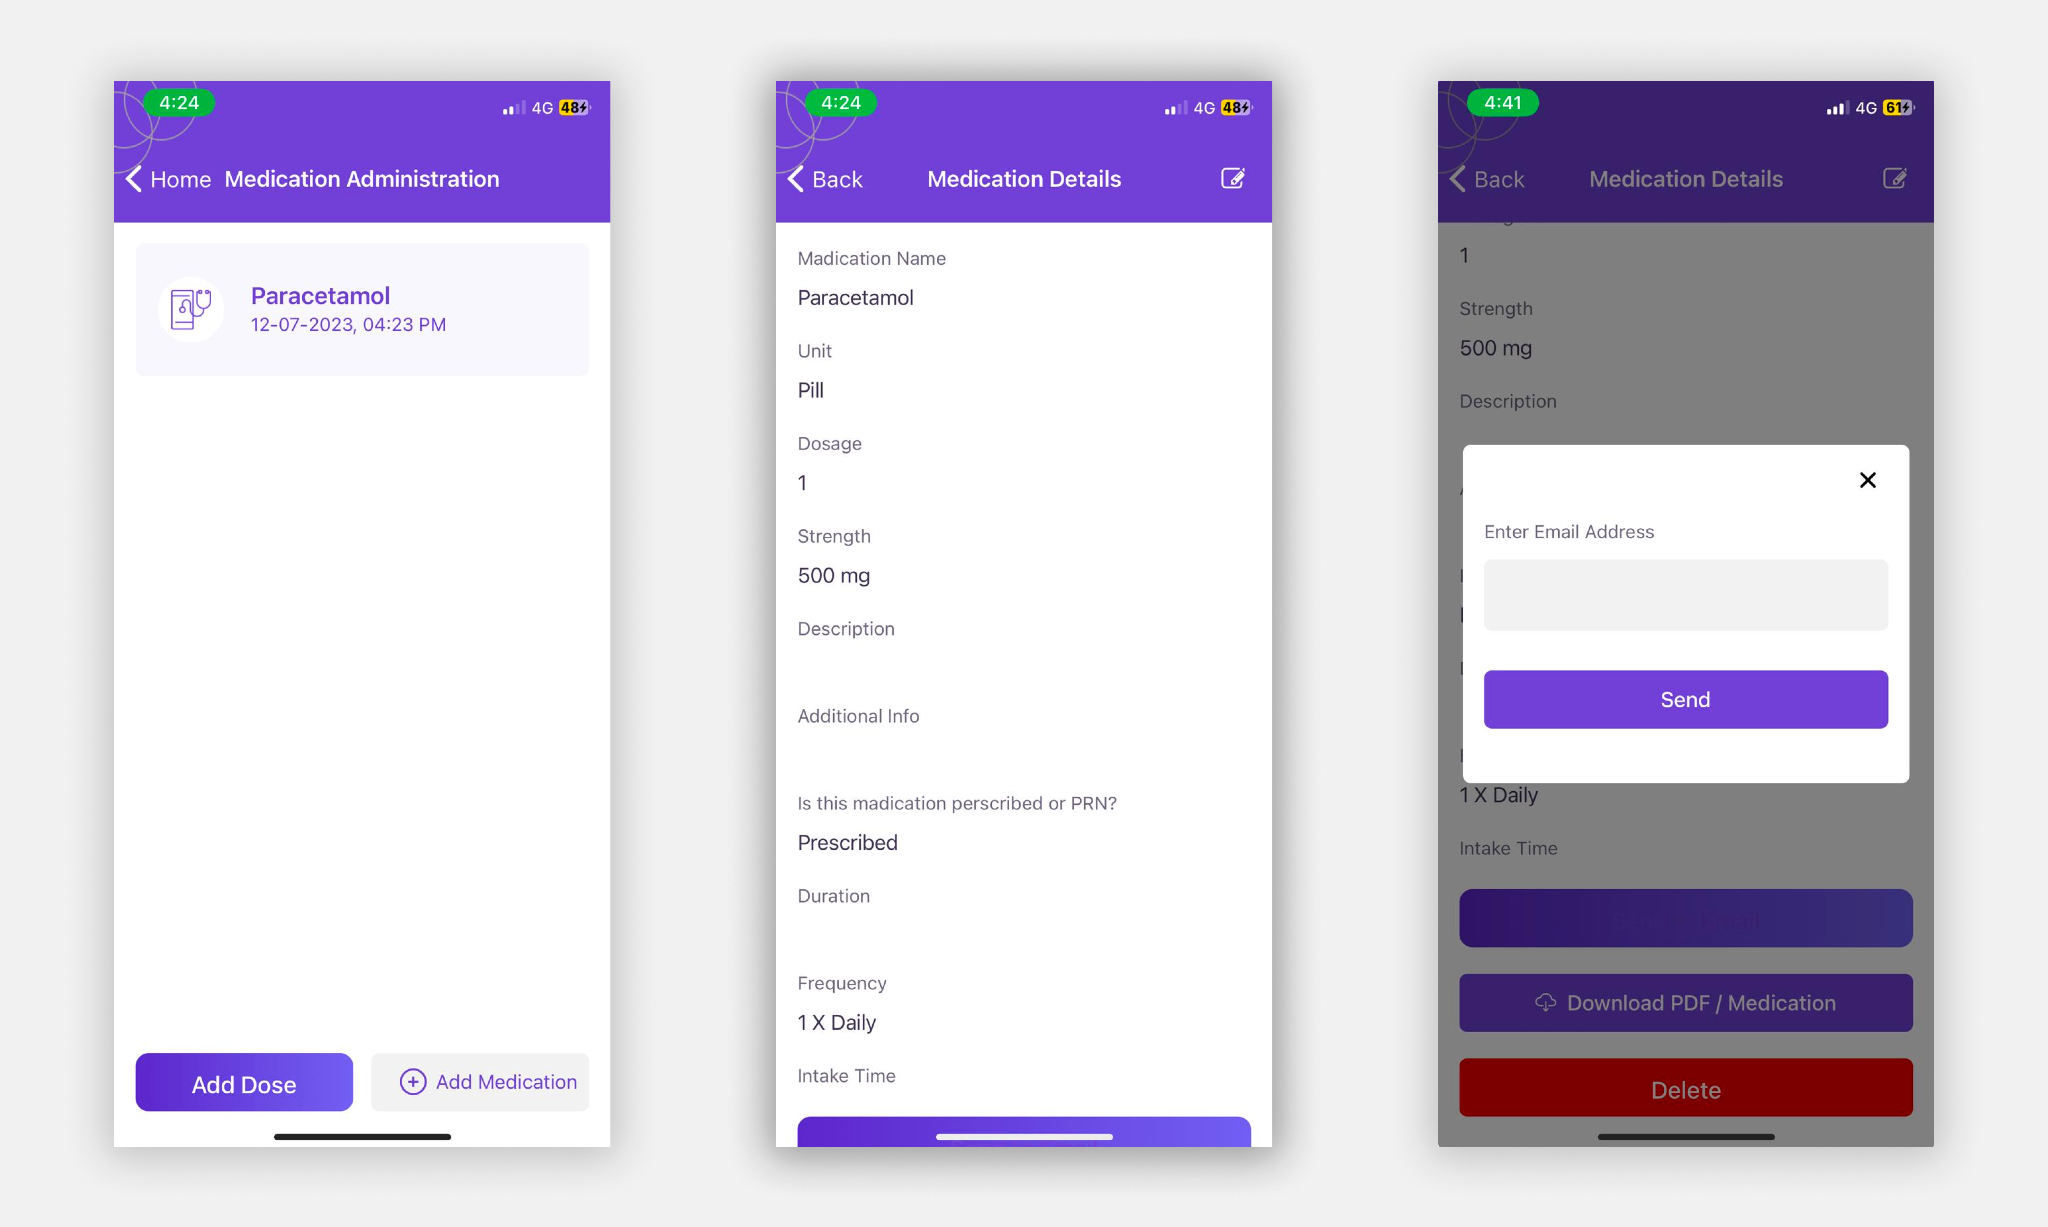
If you want to view the details of the medication, edit the medication, delete it, send a pdf copy to anyone, or even download a pdf copy for yourself you can easily do so by simply clicking on the medication name and it will show you all the available options.
3: Risk Assessment
The risk assessment feature lets create a log of any incident happening during your caregiving time. To add a risk assessment click on “Add New Risk Assessment” and fill out the form.

Step 1: On the first page add basic information like the “Date carried out” and “Date next review” and click “Next”
Step 2: On step 2 you will be asked to type about the hazard and where or when the hazard occurred. Type the information and click “Next”
Step 3: On step 3, you will be asked to enter the Impact and Likelihood score. If you are not sure about the score click on the Question Mark (?) on the upper right corner of the step 3 page and it will show you a detailed overview of the scores.
Step 4: On step 4 you will enter the solution and steps you took to manage the risk as well as information on who is responsible for the incident and the date of when the action will be complete by, and click Complete.
Comeple: On the Complete screen you will see the total calculated risk score and what the score means with detailed explanation.
View/ Edit/ Download/ Send a Risk Assesment
If you want to view the details of the Risk assessment, edit the Risk assessment, send a pdf copy to anyone, and even download a pdf copy for yourself you can easily do so by simply clicking on the Risk Assesment name and it will show you all the available options.
Note: Once a Risk assessment is saved you can not delete it.
4: Care Plan
The care plan feature lets you create plans for the client about their care and your duties. By following these step-by-step instructions, you can effectively add a care plan for a client on PocketCarer, ensuring that you have all the necessary information to provide tailored and high-quality care. Remember to regularly review and update the care plan as needed to accommodate any changes in the client’s circumstances.
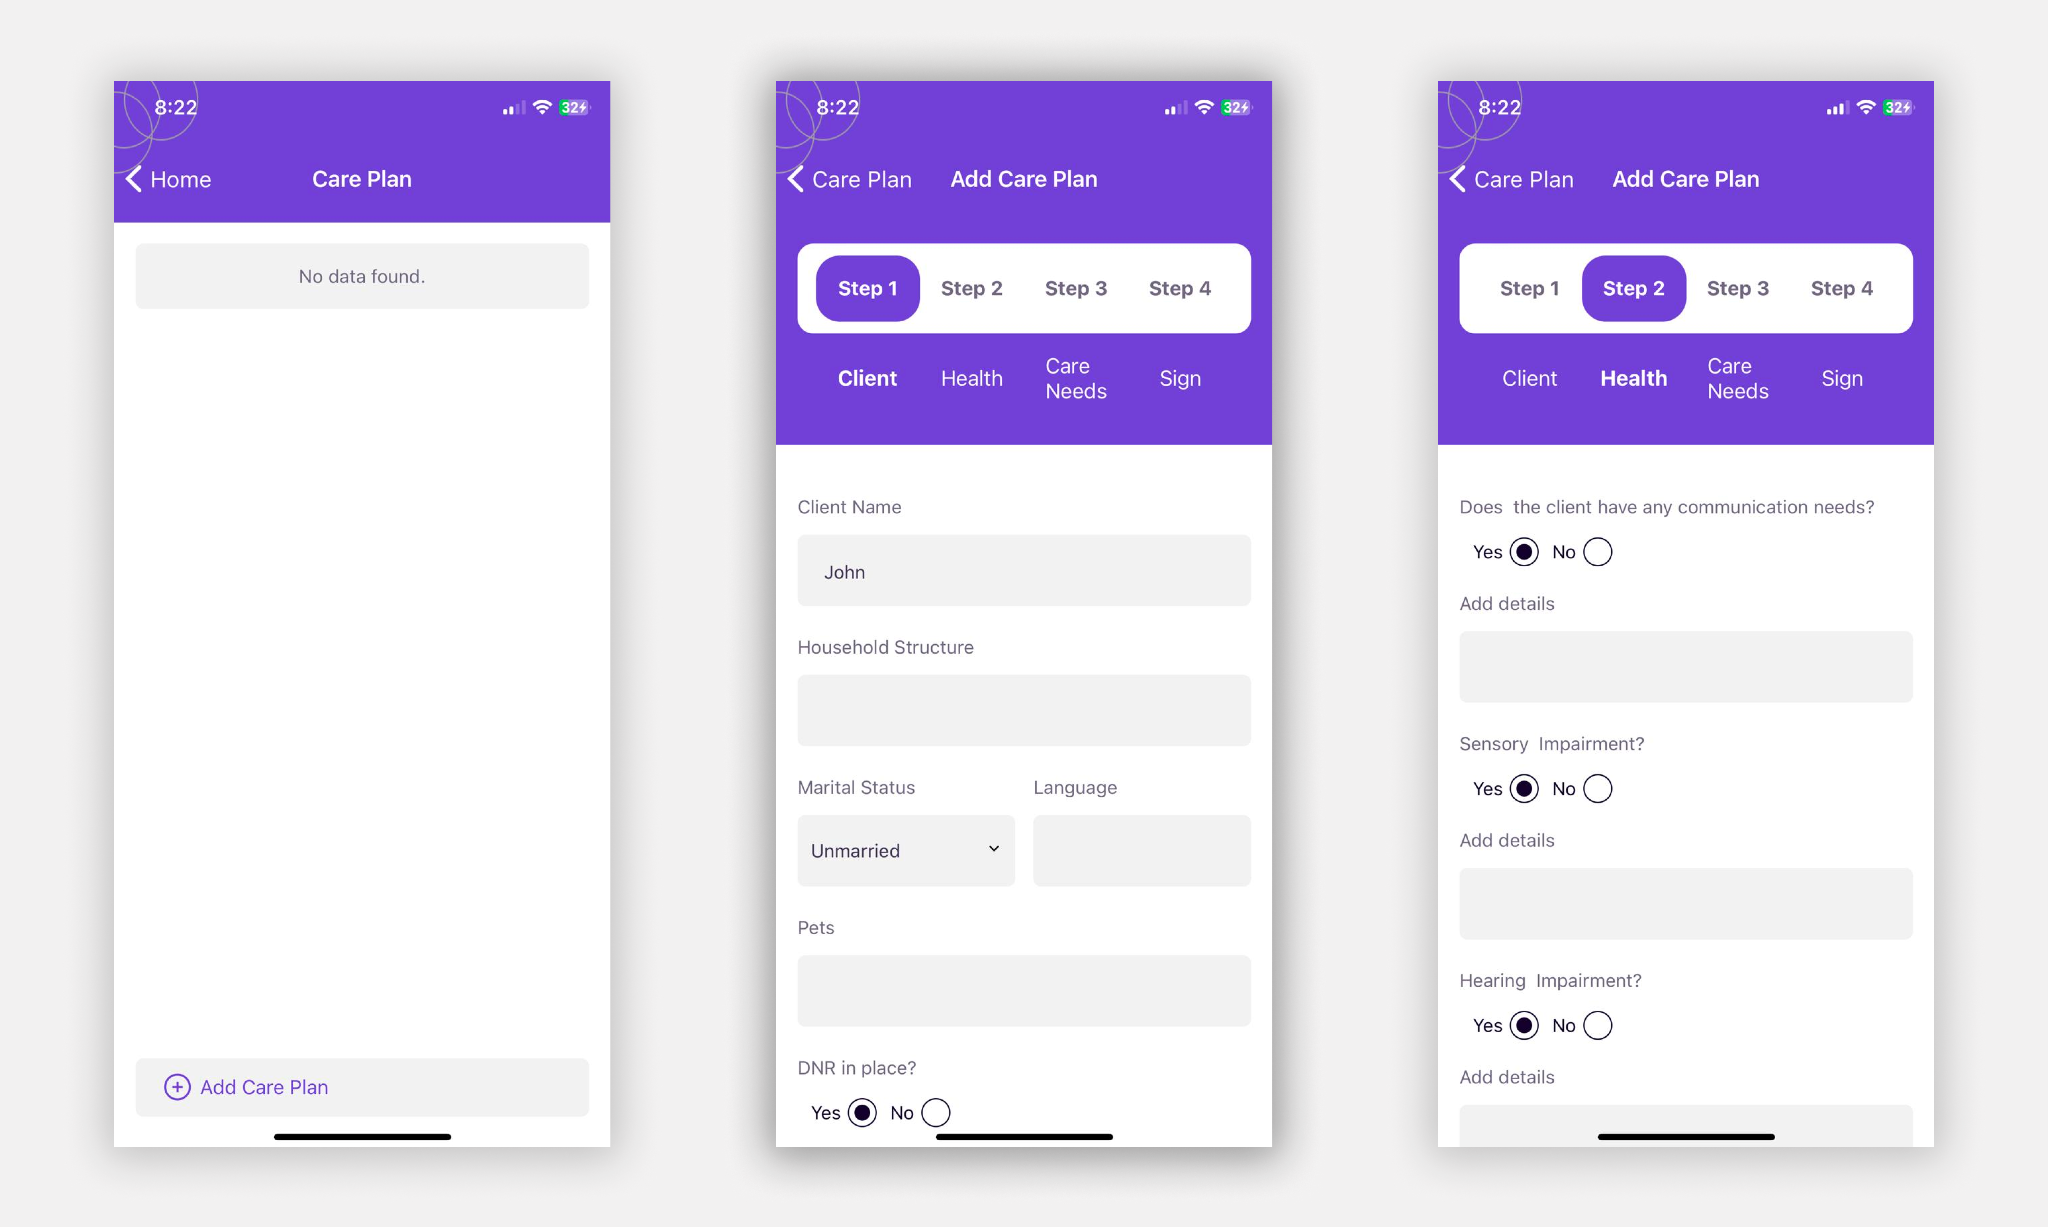
Step 1: Client Details
Open the PocketCarer app and log in to your account using your credentials.
Once logged in, navigate to the “Clients” section, typically located on the main menu or dashboard.
In the “Care Plan” feature, locate and tap on the “Add New Client” button to begin creating a care plan for a new client.
Fill in the following details about the client’s household:
- Specify the household structure, such as living alone, with a spouse, or with family members.
- Indicate the client’s marital status.
- Specify the primary language spoken by the client and their household.
- Note if there are any pets in the client’s household.
- Indicate if a Do Not Resuscitate (DNR) order is in place or not.
- Specify whether the client has a blue badge.
- Provide a brief description of the client’s current situation, including any challenges or specific needs they have.
- Enter information on what would help improve the client’s situation, such as specific support or assistance they require.
Step 2: Communication and Health Needs
Move to the next section or tab by clicking on the “Next” button
Answer the following questions related to the client’s communication requirements:
- Determine if the client has any communication needs, such as speech difficulties or reliance on alternative communication methods.
- Indicate if the client has any sensory impairments, such as visual or hearing impairments.
- Specify if the client uses a hearing aid or any other aids to support their hearing.
- Note if the client uses any sight aids, and consider including details about their optician.
- Identify any other relevant conditions or disabilities the client may have that affect their communication.
Provide information about the client’s mobility and any aids they use for assistance.
- Indicate the client’s mobility status and any mobility aids they use, such as a walker or wheelchair.
- Include details about any emotional or mental health conditions that may impact the client’s well-being.
- Enter any details regarding the client’s medication management:
- Specify if the client uses a Dossett box or dispenser for organizing their medication.
- Include relevant details about the Dossett box or dispenser, such as the manufacturer or model.
- Note the collection day for the client’s medication, if applicable.
- Indicate whether the medication is to be delivered or collected.
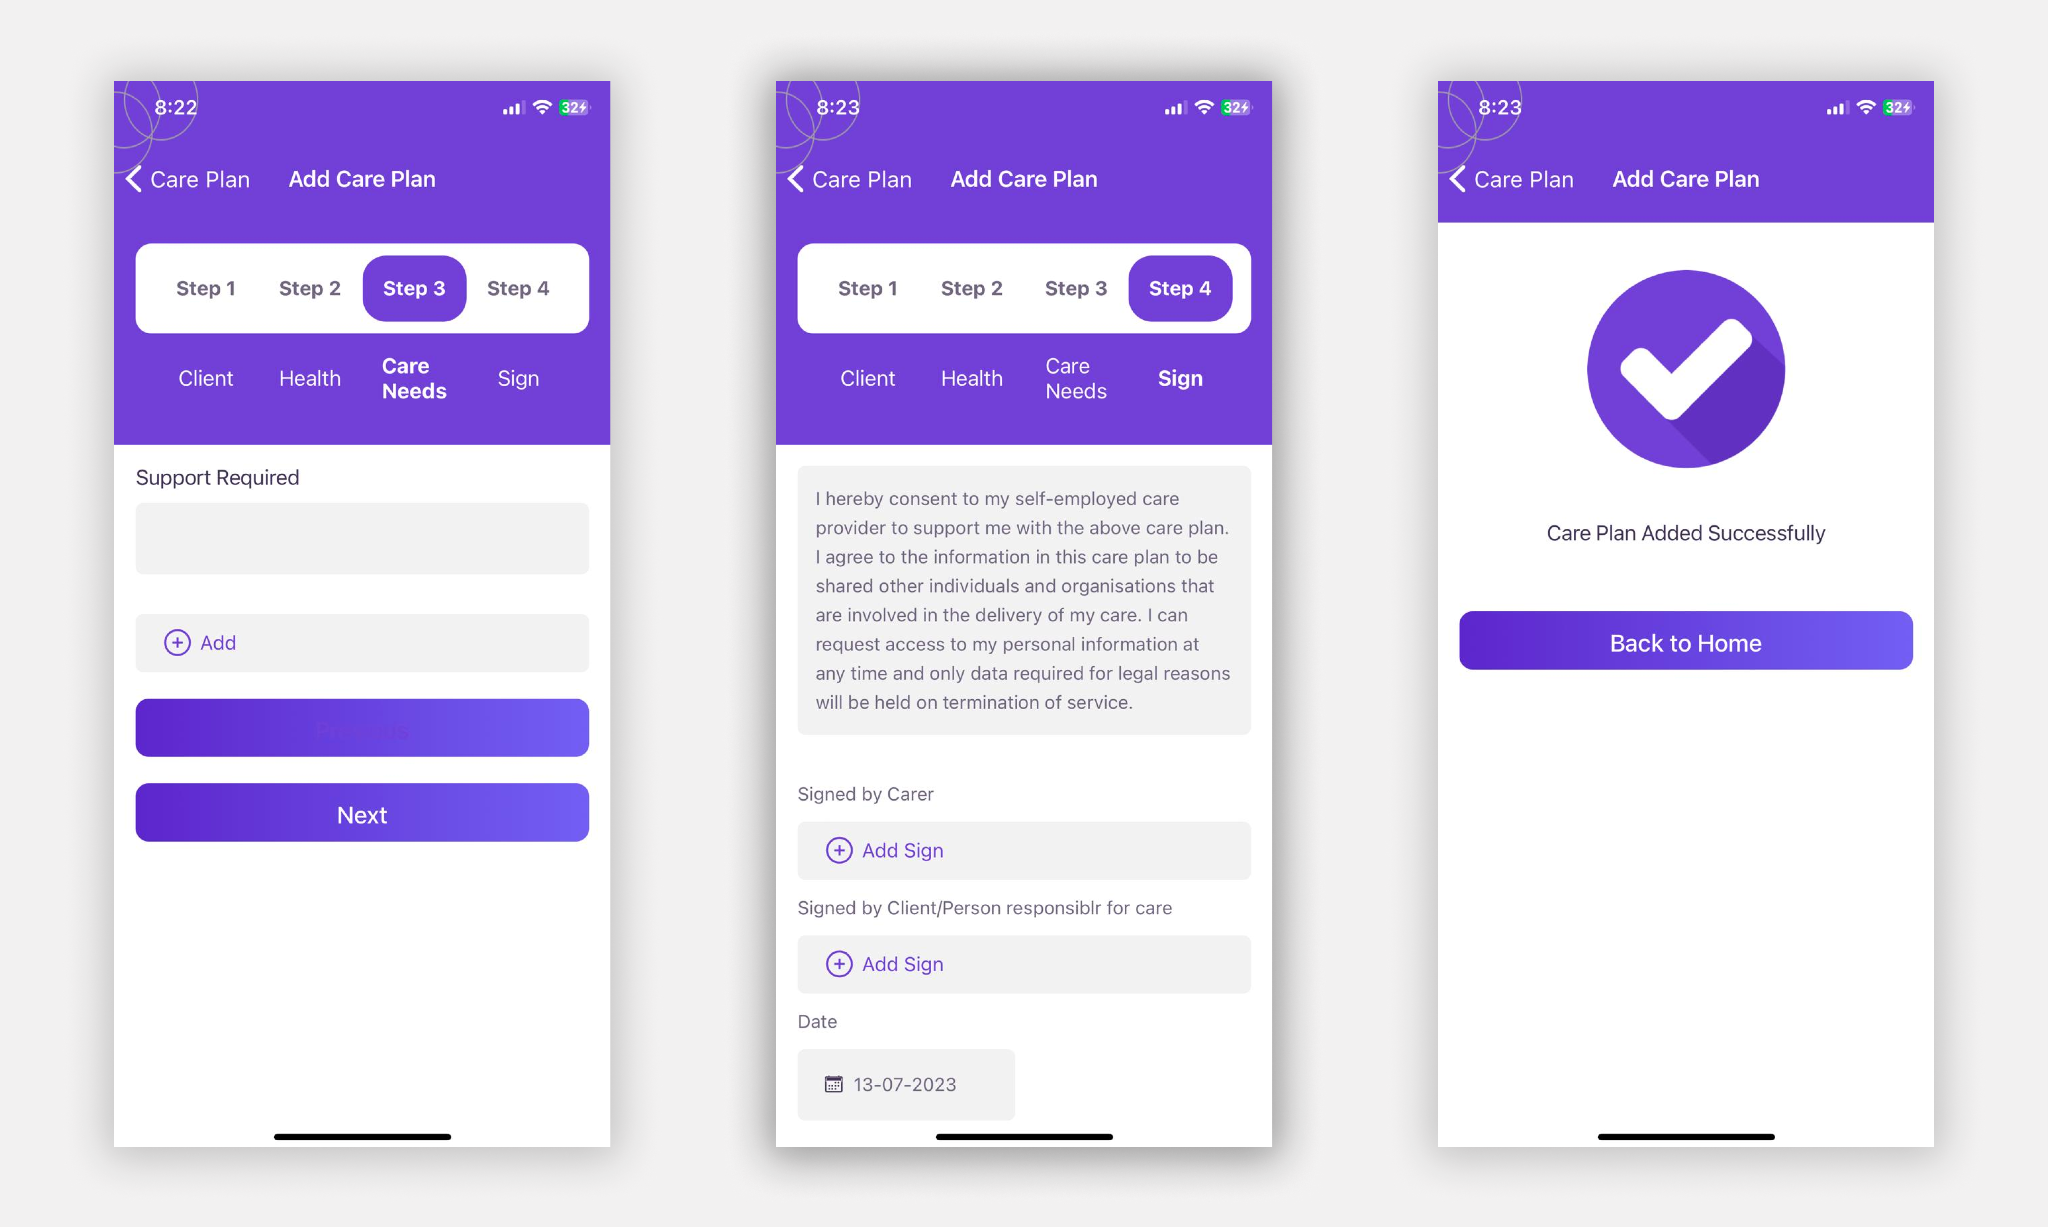
Step 3: Care Needs
Proceed to the “Care Needs” section or tab by clicking the “Next” button
- Enter comprehensive details about the specific support the client requires, such as personal care, assistance with household tasks, or specialized medical support.
- Include any preferences or instructions provided by the client or their primary caregiver regarding the delivery of care.
Step 4: Confirmation and Signatures
Proceed to the “Sign” section or tab by clicking the “Next” button
- If you are a carer, sign the care plan by typing your name or using a digital signature.
- Ensure the care plan is reviewed and signed by the client or the person responsible for their care.
- Once all required signatures are obtained, save the care plan.
5: Food Log
With the PocketCarer food log feature you can easily add and manage food log entries. Keeping a comprehensive food log helps track nutritional intake and dietary patterns, and monitor any specific dietary requirements or restrictions. Remember to regularly update the food log to maintain accurate and up-to-date records.

Step 1: Adding Food Log Entries
- In the Food Log section, locate and tap on the “Add New” button.
- Enter the date and time of the meal for which you are creating the log entry. You can either manually input the date and time or use the app’s built-in date and time selection tool.
- Select the meal type from the available options, such as breakfast, lunch, dinner, or snacks and drinks. This helps categorize the entry appropriately.
- Provide a list of food items consumed during the meal. You can either type in the food items individually or use the app’s built-in food database to search and select specific items.
- Add any additional notes related to the meal. This can include specific preparation methods, portion sizes, any dietary restrictions, or any observations or comments you want to include.
6: Fluid
With the PocketCarer Fluid feature you can easily record and manage fluid intake and output. Tracking fluid levels is essential for maintaining hydration and monitoring any changes in fluid balance. Regularly updating the fluid log will help you keep accurate records and provide valuable information for healthcare professionals if needed.
Step 1: Adding Fluid Intake
- In the Fluid section, locate and tap on the “Add Fluid Intake” button to record the fluid intake.
- Enter the date and time when the fluid intake occurred. You can either manually input the date and time or use the app’s built-in date and time selection tool.
- Specify the amount of fluid intake in milliliters (ml).
- If applicable, provide any additional comments or notes related to the fluid intake, such as the type of fluid consumed or any specific observations.
Step 2: Adding Fluid Output
- In the Fluid section, locate and tap on the “Add Fluid Output” button to record the fluid output.
- Enter the date and time when the fluid output occurred. You can either manually input the date and time or use the app’s built-in date and time selection tool.
- Specify the amount of fluid output in milliliters (ml).
- If applicable, provide any additional comments or notes related to the fluid output, such as the reason for the output or any specific observations.
7: Bowel Chart
With the PocketCarer Bowel Chart feature you can easily record and manage bowel chart entries. Tracking bowel movements and noting any changes or abnormalities can provide valuable information for healthcare professionals and help monitor digestive health. Regularly updating the bowel chart will ensure accurate records and support effective communication with healthcare providers if necessary.

Step 1: Adding a Bowel Chart Entry
- In the Bowel Chart section, locate and tap on the “Add Bowel Chart” button to record a bowel chart entry.
- Enter the date and time of the bowel movement. You can either manually input the date and time or use the app’s built-in date and time selection tool.
- Select the type of bowel movement from the available options. This can include categories such as form, loose, watery, constipated, or other relevant descriptions.
- Provide any additional details or observations related to the bowel movement in the designated field. This can include color, consistency, any discomfort experienced, or any other noteworthy information.
Note: if you are not sure about the type, you can click on the “Click here to view the bristol chart” button to see the different types.
8: Observation
The PocketCarer Observation feature lets you can easily record and manage observation entries. Observations help track and monitor the client’s vital signs, symptoms, or specific conditions. Regularly updating the observation log ensures accurate records and supports effective communication with healthcare professionals if necessary.
Step 1: Adding an Observation
- In the Observation Log section, locate and tap on the “Add Observation” button to record a new observation.
- Fill in the following details related to the client:
- Client’s name.
- Specify the client’s gender.
- Provide the client’s date of birth.
- Enter the client’s address.
- Note the client’s doctor’s name and telephone number.
- Specify the client’s GP surgery.
- Select the date of the visit and the type of observation being conducted.
Step 2: Adding Observation Details
- In the next step of the observation entry, provide the following information:
- State the reason for the observation. This could be related to a specific condition, monitoring a symptom, or any other relevant reason.
- Specify the frequency of the observation, such as once a day, every few hours, or as required.
- Record the client’s temperature in the appropriate unit (Celsius or Fahrenheit).
- Note the client’s pulse rate (heart rate).
- Record the client’s respiration rate and oxygen saturation levels (02sats).
- Enter the client’s blood pressure (BP) readings, including systolic and diastolic values, and click the “Complete” button.
9: Body Map
The PocketCarer body map feature is an advanced feature that lets you can easily record and manage body map entries. Body maps provide visual documentation of injuries or conditions on specific body parts, aiding in tracking progress and identifying any changes. Regularly updating the body map log ensures accurate records and supports effective communication with healthcare professionals if necessary.
Step 1: Adding a Body Map Entry
- In the Body Map section, locate and tap on the “Add Body Map” button to record a new entry.
- Fill in the following details related to the client:
- The client’s name.
- Specify the date the body map was carried out.
- Provide the date for the next review of the body map.
- Enter the client’s date of birth and click “Next”
Step 2: Adding Injury Details
- In the next step, specify the injury details:
- Type the injury type.
- Write where in the body is the injury
- Put additional information if needed and click “Next”
Step 2: Injury map
- Indicate the location of the injury on the body map image. The image should have selectable parts where you can indicate the specific area of the injury and click “Complete”
9: Invoice
The PocketCarer client invoice gives you the ability to easily manage client invoices. Storing invoice templates allows for efficient invoice creation, while the ability to create new invoices with specific details ensures accurate and professional billing. Regularly updating and managing invoices supports effective financial management and payment tracking.

Step 2: Invoice Templates
- In the Invoice section, locate and tap on the “Invoice Templates” button to manage and save invoice templates for future use.
- Fill in the following fields to create an invoice template:
- Enter the client or payee details, including their name and contact information.
- Specify the Unique Taxpayer Reference (UTR) number if applicable.
- Provide the account holder name, name of the bank, sort code, and account number for payment purposes.
- Save the template by tapping the “Create” button. The template will be stored for future use.
Step 3: Creating a New Invoice
- In the Invoice section, locate and tap on the “Create New Invoice” button to generate a new invoice.
- Select an existing invoice template from the available options, which includes the client or payee details, service details, and an optional invoice logo.
- If necessary, modify the client or payee details for this specific invoice and click “Next”.
- Provide the UTR number, account holder name, name of the bank, sort code, and account number for payment purposes.
- Enter the invoice date, specifying the date the invoice is being issued.
- Specify the number of days until payment is required. This indicates the payment deadline for the invoice and click “Complete” to save the invoice.
9: Relatives
The PocketCarer relative feature lets you have the option to add a relative or family member of the client. The family member can then download the “PocketCarer Relatives” app to see the logs. The relatives can only view the log and not edit or modify anything.
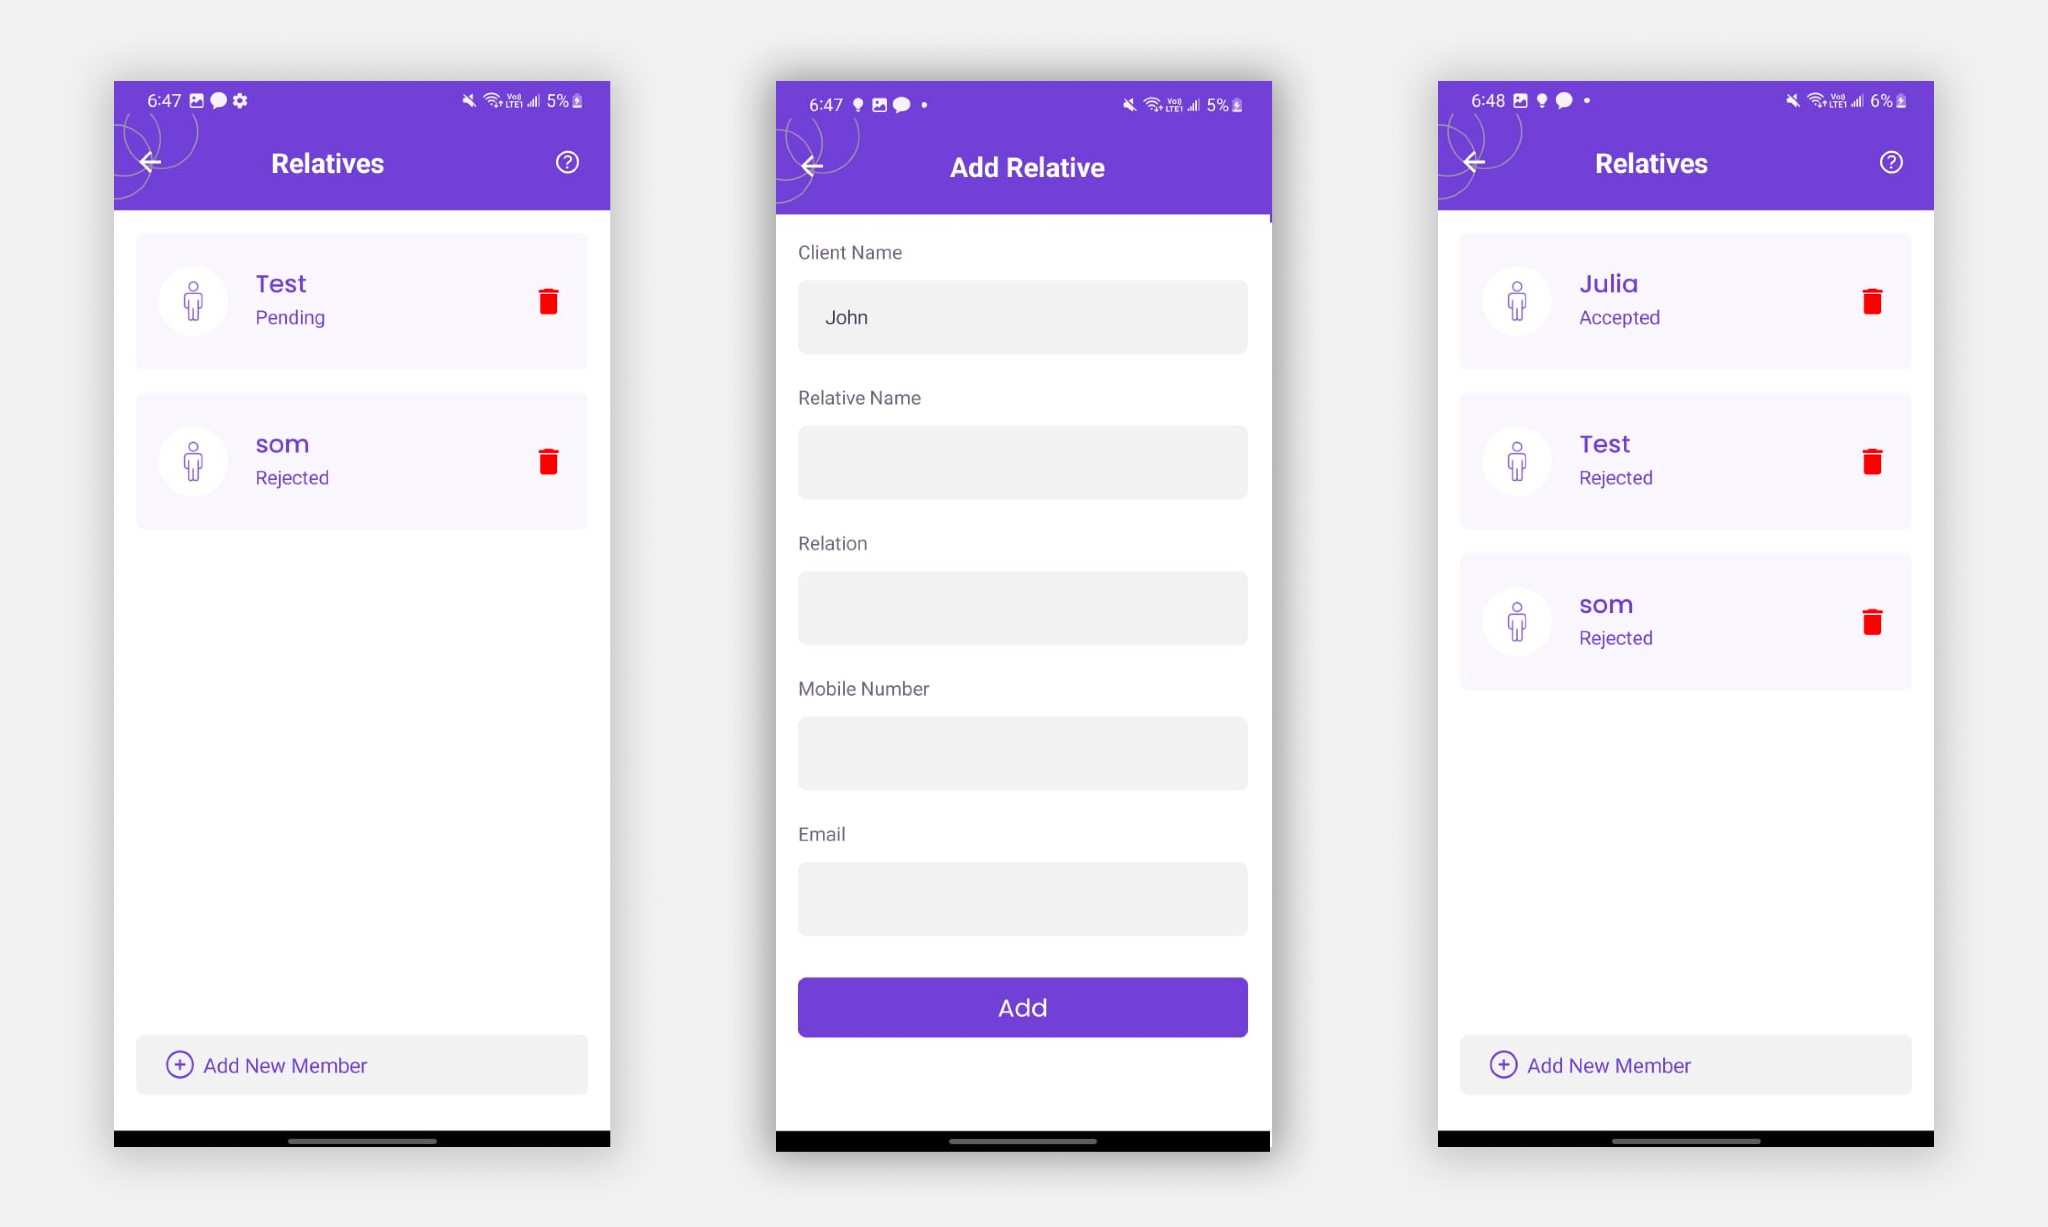
Adding a relative
- Click on the “Add New Member” button at the bottom of the page.
- Fill out the form, with the Relative name, Relation, Mobile Number, and Email, and click “Add” to add the relative.
- After clicking on the “Add” button it will show the name and the status as “Pending” on this page. And the relative will get a notification to their email address.
Note: If the Relative wants to use the “PocketrCarer Relatives” app to view the logs of their family member, they will need to create a free PocketCarer Relatives account with the same email address you are using here to add the relative.
10: Contract
You can easily manage your care contracts in PocketCarer. Creating new contracts with relevant details or uploading existing contracts allows for efficient contract management. Regularly reviewing and updating contracts ensures accurate records and supports effective communication and agreement between carers and clients.
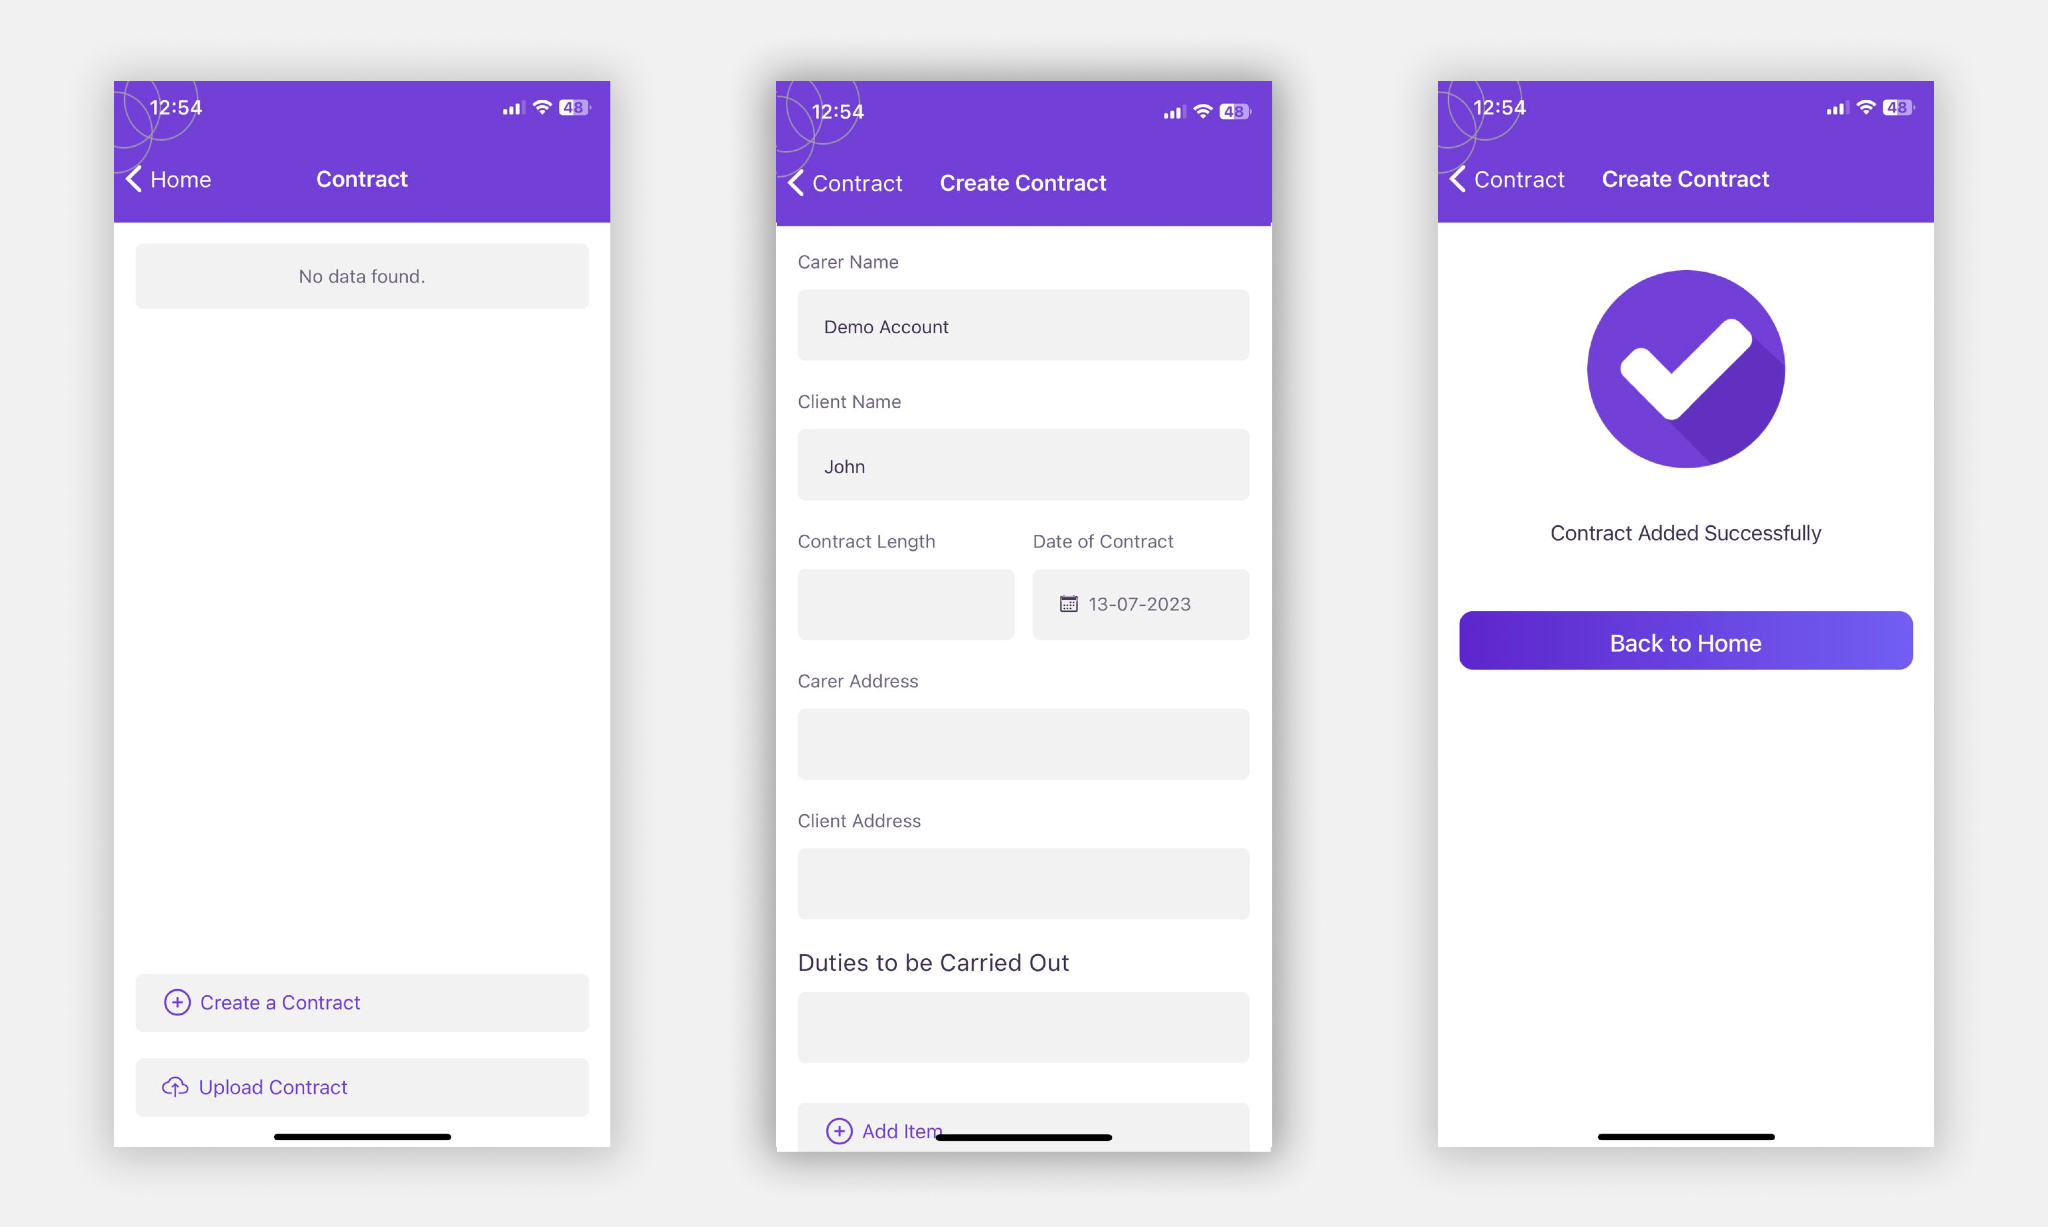
Step 1: Creating a Contract
- In the Contract section, locate and tap on the “Create a Contract” button to generate a new contract.
- Fill in the following fields to create the contract:
- Name of the carer.
- Name of the client.
- Define the length or duration of the contract.
- Enter the date when the contract comes into effect.
- Provide the address of the carer.
- Specify the duties or responsibilities that the carer will carry out.
- Specify the payment details, including how the carer will be paid and the agreed-upon rate.
- The carer’s signature.
- The client’s signature.
- Optional: If applicable, select the “Send to Client’s Mail” option to send the contract to the client’s email address and click “Add”
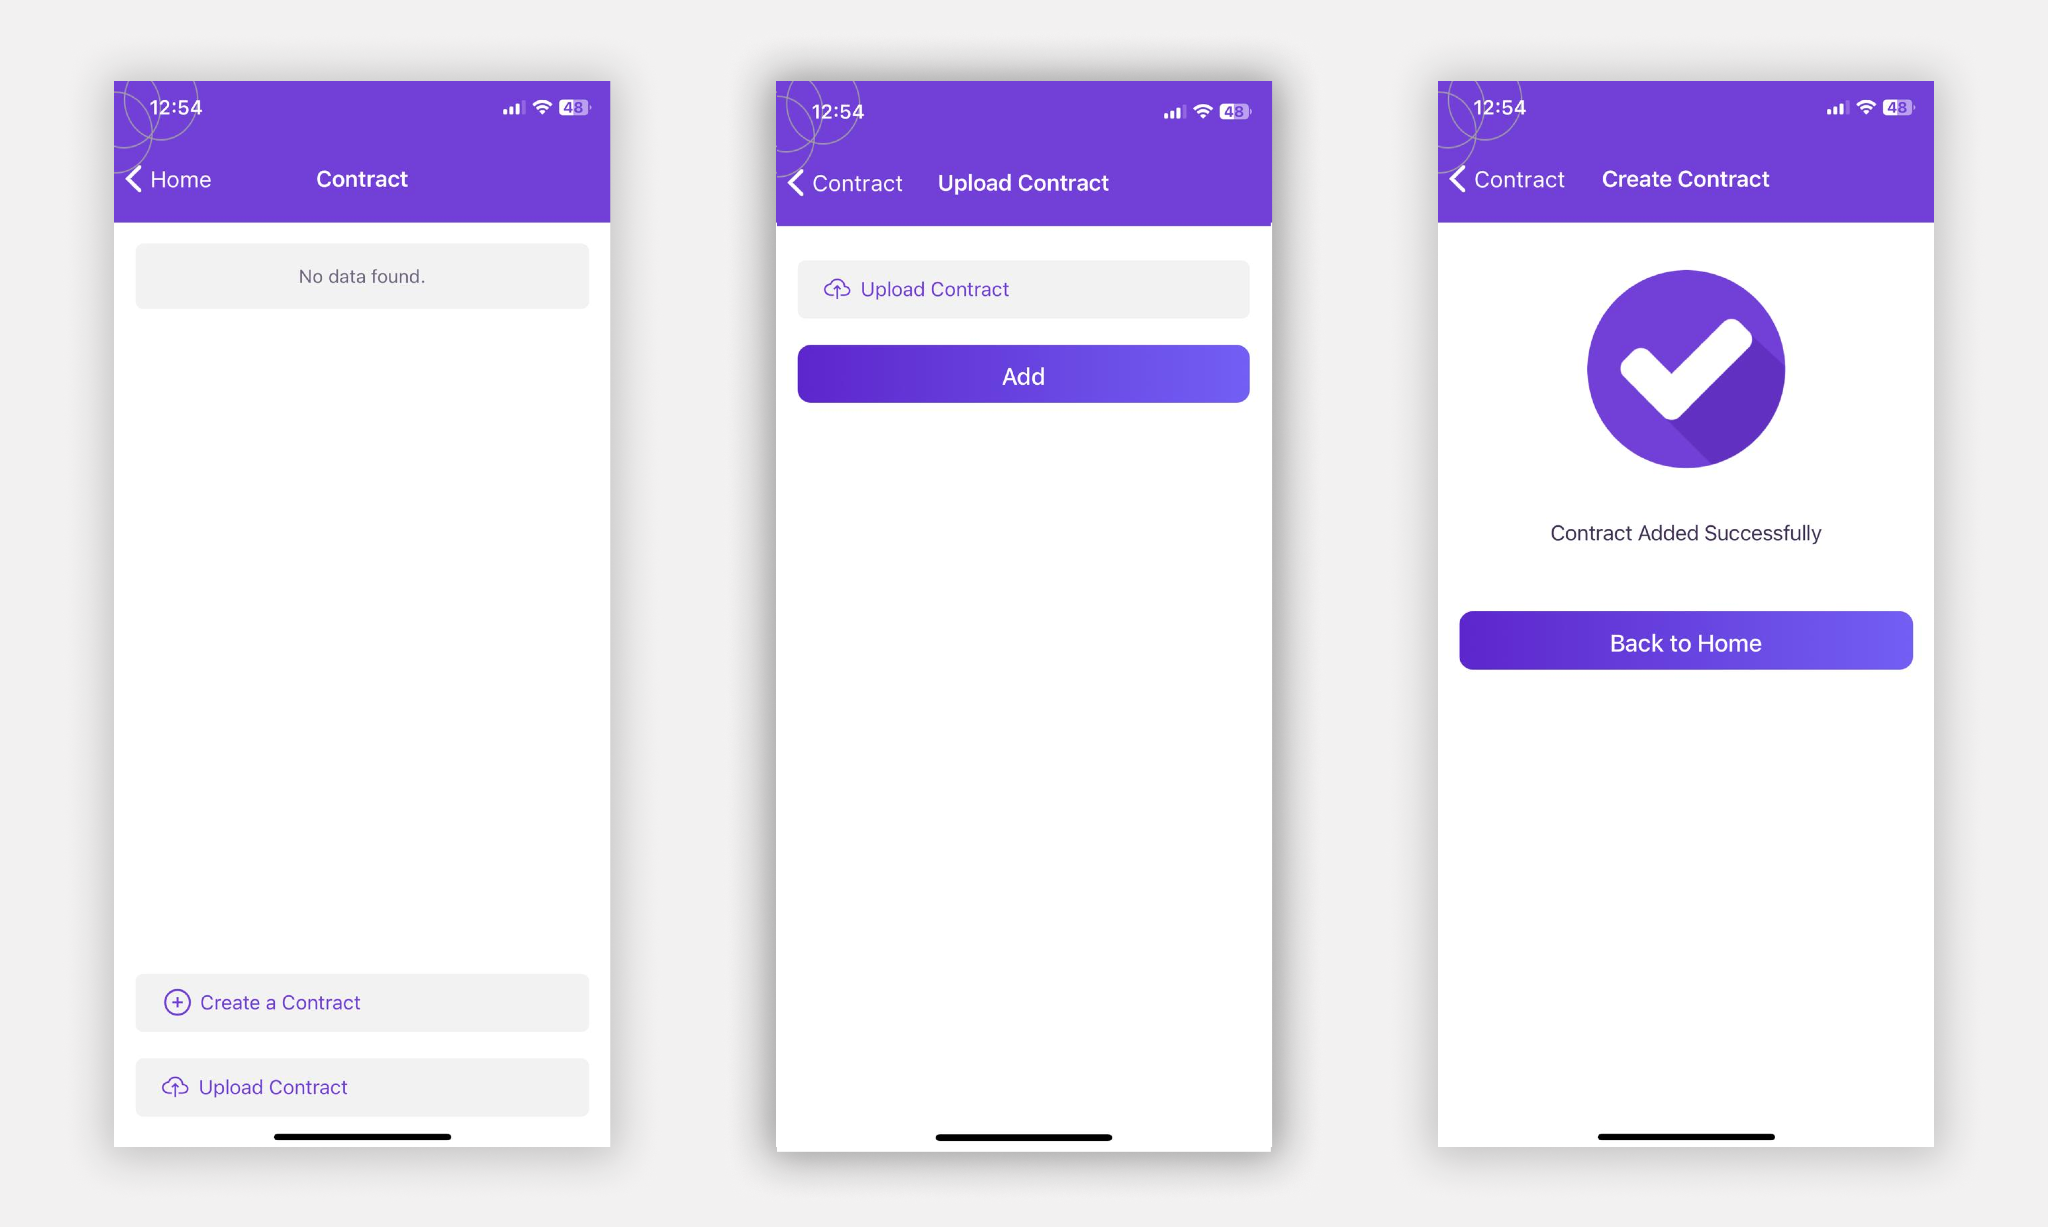
Step 2: Uploading a Contract
If you have a contract created already, you simply upload the contract in PocketCarer.
- In the Contract section, locate and tap on the “Upload a Contract” button to upload an existing contract.
- Browse your device’s storage or file manager to locate the contract file. (The accepted file formats are images (JPEG, PNG), PDF documents, or document files (DOC, DOCX).)
- Select the contract file and upload it to the PocketCarer app.